
Explore our expert-made templates & start with the right one for you.
Snowpipe Streaming: What’s New, Use Cases, and Best Practices
-
 Eran Levy
- Building Data Pipelines
- March 22, 2023
Learn the ins and outs of snowpipe with our comprehensive cheatsheet. Discover everything from creating stages, pipes, to efficient data loading. Gain valuable insights on handling semi-structured data, optimizing performance, cost management, and effective error troubleshooting. [Download]
Snowpipe Streaming was released to public preview, adding new streaming ingestion capabilities for Snowflake tables. But it’s easy to get confused:
- How is the new API different from what was already possible with Snowpipe?
- When would you use one vs the other?
- Should you consider a different tool altogether?
We’ll try to succinctly answer these questions below. We’ll also look at what Snowpipe Streaming changes when it comes to your broader data architecture considerations, talk about its advantages and limitations, and compare it to other Snowflake-native ingestion options as well as Upsolver SQLake. To complete the picture, we’ll summarize some best practices for working with Snowpipe Streaming.
Snowpipe: A Quick Refresher
Before diving into Snowpipe Streaming, let’s quickly get up to speed on Snowpipe. Snowpipe is a serverless data ingestion service offered by Snowflake, designed to simplify the process of loading data into Snowflake data warehouses. When new files are ingested from a source, Snowpipe automatically triggers a pipeline that loads the data into the appropriate Snowflake table.
What is Snowpipe Streaming?
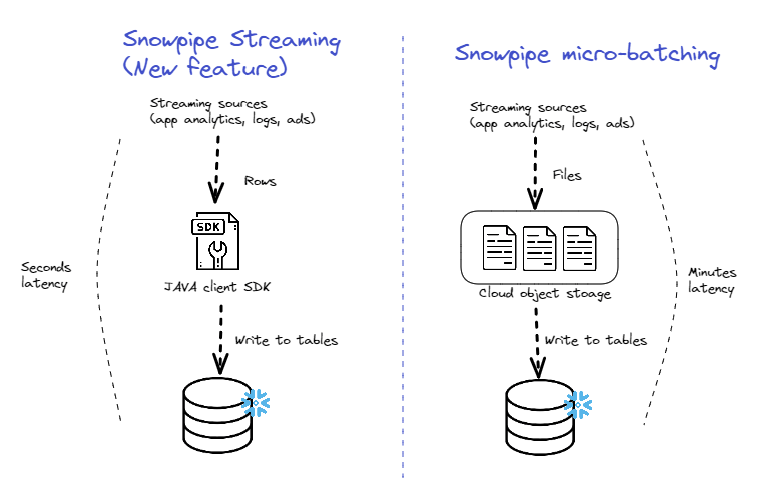
Snowpipe Streaming is a new data ingestion feature released by Snowflake to public preview on March 7, 2023. It allows users to write rowsets from streaming sources (such as app analytics, sensors, or CDC events) directly into Snowflake tables over HTTPS, without setting up a pipeline or using intermediary cloud storage (e.g. Amazon S3).
Using the Snowpipe Streaming API and the new Client SDK differs from The original Snowpipe, which is based on micro-batching files written to cloud storage. The main advantage of using the new API is lower latency (we cover additional advantages and limitations below) and the elimination of the extra step of moving the data from the source to cloud storage:
Use Cases for Snowpipe Streaming
What can you do with Snowpipe Streaming that you couldn’t do with the original Snowpipe? There are two main scenarios where the new streaming ingestion feature can help you. Keep in mind both versions can only write to Snowflake:
- Real-time data ingestion: This is relevant when a business needs data to be available in Snowflake within seconds of the event being recorded. For example, a security analyst might need to analyze log data as soon as an incident is detected in order to determine the appropriate mitigation.
- Unifying streaming and batch operations: In Snowflake’s announcement of the feature, they highlighted the potential for Snowpipe Streaming to simplify real-time architecture. The idea is that instead of running separate pipelines or systems for batch, micro-batch, and streaming ingestion, you can now use Snowpipe for both real-time and historical data.
Comparing Snowflake-native Data Ingestion Methods – Snowpipe Streaming vs Snowpipe Batch vs Copy Into
The Streaming API is meant to supplement existing ingestion methods rather than replace them. It is meant to support real-time use cases, where a specific event needs to be written to a Snowflake table while ensuring exactly-once semantics and deduplication at the event (rather than a file) level.
You can see a full summary of the differences below:
| Snowpipe Streaming | Snowpipe | COPY INTO | |
| Data ingestion method | Streaming | Continuous / micro-batching | Batch |
| Sources | Kafka, various (over HTTPS via Java code) | Cloud storage | Cloud storage |
| Real-time ingestion | Yes, but insert only | Near real-time | No |
| Configuration required | High (need to write Java client), lower for Kafka. | Low | Higher |
| Resource allocation | Serverless | Serverless | Requires virtual warehouse |
| Suitable for | Low-latency streaming data | Frequent, small data loads | Periodically ingesting large batches of data |
| Usage cost | Pay per processing time (potential high cost) | Pay per processing time | Pay per virtual warehouse usage |
| Deduplication | Rows | Files | None |
| Ordering | Within a channel | Within a file | None |
| Primary Use Cases | Event-based data: IoT, app analytics, ads, CDC… | Multiple sources with varying frequency and size | Non-time-sensitive data loads |
Say Goodbye to Big Data Ingestion Headaches with Upsolver
Ready to simplify your big data ingestion?
Test drive Upsolver now!- Enjoy effortless, continual data ingestion to your warehouse and lake
- Trust in on-time, exactly-once, and strongly ordered data with Upsolver’s bulletproof technology
- Benefit from advanced features such as drift detection, schema evolution, and replay
- Monitor and inspect your data with Upsolver’s powerful observability tools
How does Snowpipe Streaming work?
There are two main ways of using Snowpipe Streaming:
1. The Client SDK
Snowflake has provided a Client SDK as part of its Java Ingest SDK. It can be implemented within application code to send events directly to Snowflake via the new streaming API.
Channels are a key concept in Snowpipe Streaming, representing logical partitions that correspond to connections between clients and destination tables. Clients can open multiple channels to different tables. Channels have an ownership property, which ensures data arrives once for a particular channel.
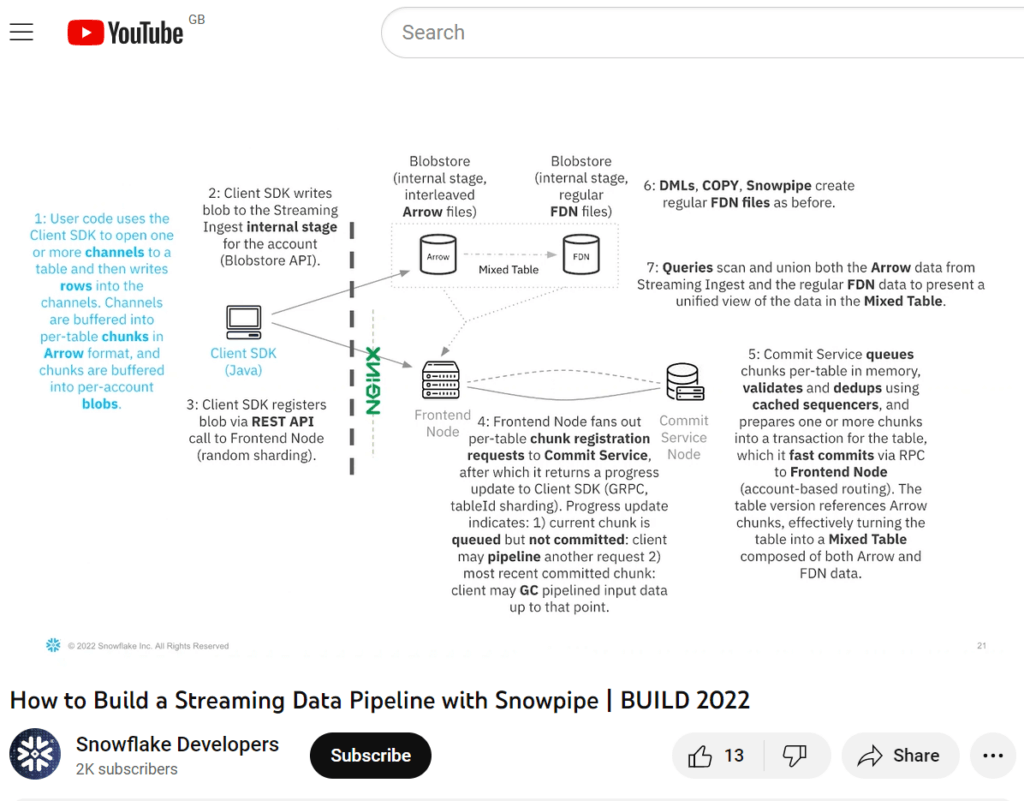
The client SDK provides APIs for opening and closing channels and for inserting rows with offset tokens. Offset tokens help track the source of the data and ensure exactly-once ingestion at the row level. The data is buffered and periodically written as encrypted blobs to an internal Snowflake-managed stage. These blobs are then registered with Snowflake, turning tables into mixed tables containing both Snowflake’s proprietary FDN format and the client-generated files (stored in BDEC format). Mixed tables can be queried immediately, and are migrated into regular tables over time.
Details of the internal architecture and query processing were featured in a presentation shown the Snowflake Developers YouTube channel:
Here is an example of the code required to build a simple Snowflake streaming application:
/*
 * Copyright (c) 2021 Snowflake Computing Inc. All rights reserved.
 */

package net.snowflake.ingest.streaming.example;

import com.fasterxml.jackson.databind.JsonNode;
import com.fasterxml.jackson.databind.ObjectMapper;
import java.nio.file.Files;
import java.nio.file.Paths;
import java.util.HashMap;
import java.util.Iterator;
import java.util.Map;
import java.util.Properties;
import net.snowflake.ingest.streaming.InsertValidationResponse;
import net.snowflake.ingest.streaming.OpenChannelRequest;
import net.snowflake.ingest.streaming.SnowflakeStreamingIngestChannel;
import net.snowflake.ingest.streaming.SnowflakeStreamingIngestClient;
import net.snowflake.ingest.streaming.SnowflakeStreamingIngestClientFactory;

/**
 * Example on how to use the Streaming Ingest client APIs.
 *
 * <p>Please read the README.md file for detailed steps
 */
public class SnowflakeStreamingIngestExample {
  // Please follow the example in profile_streaming.json.example to see the required properties, or
  // if you have already set up profile.json with Snowpipe before, all you need is to add the "role"
  // property.
  private static String PROFILE_PATH = "profile.json";
  private static final ObjectMapper mapper = new ObjectMapper();

  public static void main(String[] args) throws Exception {
    Properties props = new Properties();
    Iterator<Map.Entry<String, JsonNode>> propIt =
        mapper.readTree(new String(Files.readAllBytes(Paths.get(PROFILE_PATH)))).fields();
    while (propIt.hasNext()) {
      Map.Entry<String, JsonNode> prop = propIt.next();
      props.put(prop.getKey(), prop.getValue().asText());
    }

    // Create a streaming ingest client
    try (SnowflakeStreamingIngestClient client =
        SnowflakeStreamingIngestClientFactory.builder("MY_CLIENT").setProperties(props).build()) {

      // Create an open channel request on table MY_TABLE, note that the corresponding
      // db/schema/table needs to be present
      // Example: create or replace table MY_TABLE(c1 number);
      OpenChannelRequest request1 =
          OpenChannelRequest.builder("MY_CHANNEL")
              .setDBName("MY_DATABASE")
              .setSchemaName("MY_SCHEMA")
              .setTableName("MY_TABLE")
              .setOnErrorOption(
                  OpenChannelRequest.OnErrorOption.CONTINUE) // Another ON_ERROR option is ABORT
              .build();

      // Open a streaming ingest channel from the given client
      SnowflakeStreamingIngestChannel channel1 = client.openChannel(request1);

      // Insert rows into the channel (Using insertRows API)
      final int totalRowsInTable = 1000;
      for (int val = 0; val < totalRowsInTable; val++) {
        Map<String, Object> row = new HashMap<>();

        // c1 corresponds to the column name in table
        row.put("c1", val);

        // Insert the row with the current offset_token
        InsertValidationResponse response = channel1.insertRow(row, String.valueOf(val));
        if (response.hasErrors()) {
          // Simply throw if there is an exception, or you can do whatever you want with the
          // erroneous row
          throw response.getInsertErrors().get(0).getException();
        }
      }

      // If needed, you can check the offset_token registered in Snowflake to make sure everything
      // is committed
      final int expectedOffsetTokenInSnowflake = totalRowsInTable - 1; // 0 based offset_token
      final int maxRetries = 10;
      int retryCount = 0;

      do {
        String offsetTokenFromSnowflake = channel1.getLatestCommittedOffsetToken();
        if (offsetTokenFromSnowflake != null
            && offsetTokenFromSnowflake.equals(String.valueOf(expectedOffsetTokenInSnowflake))) {
          System.out.println("SUCCESSFULLY inserted " + totalRowsInTable + " rows");
          break;
        }
        retryCount++;
      } while (retryCount < maxRetries);

      // Close the channel, the function internally will make sure everything is committed (or throw
      // an exception if there is any issue)
      channel1.close().get();
    }
  }
}
Source: Github
2. The Kafka Connector
Version 1.9.1 and onwards of Snowflake’s Kafka connector can be configured to use the Snowflake Streaming API. This allows data from Kafka topics to be streamed directly into Snowflake tables on a per-row basis, rather than in files. This means Kafka data is available in Snowflake tables faster and can potentially reduce ingestion costs.
The connector uses the Client SDK under the hood, but reduces the configuration overhead and saves users the need to write a Java client (for the use cases where it is applicable). The streaming API can be used with open-source Kafka as well as the cloud-managed Kafka offered by AWS or Confluent.
What Are the Advantages of Snowpipe Streaming?
- Lower latency: As we’ve mentioned above, the move from batch to stream can reduce latency from minutes to seconds – which could be useful in scenarios where real-time access to data is crucial.
- Lower cost for ingestion: Original Snowpipe amortizes cost across batches, while the streaming API allows for more granularity. You might see additional minor savings from removing the need for storing streaming data in a stage table in Snowflake. (Note that these factors would not affect the transformation costs, as we cover below).
- Ordering: With Snowpipe batch, ordering is not preserved across files, and the data is written in the order in which the files are ingested. Snowpipe Streaming provides ordering per channel.
- Exactly-once semantics: Snowpipe batch handles deduplication on the file level; Snowpipe Streaming guarantees each event is written exactly once (row level) though this has to be manually configured using the offset token mechanism.
Limitations of Snowpipe Streaming
- Requires a Java client to be written: If your streaming use case isn’t covered by the Kafka connector – e.g., if you are ingesting from another streaming service such as Amazon Kinesis, working with change-data-capture streams, or need support for features such as schema evolution – you will need to write a client in Java for each source in order to use the streaming API. This can add a significant level of complexity to your ingestion architecture compared to using SQL-based solutions.
- Increased vendor lock-in: While there are advantages to consolidating different services, it’s important to weigh them against lock-in aspects. Snowpipe, including the Streaming API, stores data in the proprietary FDN format, meaning pipelines and transformations you build will only be available in Snowflake. This reduces your ability to save costs by shifting analytical workloads to other services. It can also saddle you with high costs due to the need to continuously transform the data streams you are ingesting within Snowflake, rather than using more cost-efficient processing engines.
- Insert-only: At the time of this writing, the API is limited to inserting rows. Updating records still requires writing data to staging tables.
What the New API Does (and Doesn’t) Change About Streaming Data Architecture in Snowflake
Snowflake Streaming can be faster and more efficient than the previous batch-based approaches to Snowflake data ingestion. However, the core architectural considerations haven’t really changed – the Streaming API still writes data in proprietary file formats, and locks you further into the Snowflake ecosystem when it comes to data transformation. You can read our previous article on the differences between Snowflake and an open data lake.
In this context, it’s important to note that data transformation costs are unchanged by the new API. You will still need to pay a premium for every new pipeline or transformation you run in Snowflake. With streaming data – particularly when it is joined with historical records – these costs can rack up, far exceeding the initial ingestion costs, and in ways that are harder to predict: do you really know today what kind of analysis you’ll want to run one year from now? This is one of the reasons why we price SQLake per-data ingested.
The bottom line: if your main or only target is Snowflake and you are okay with the cost of continuously transforming data in Snowflake, the new streaming API is worth exploring. Otherwise, you should look at other options.
Simplify Your Big Data Ingestion with Upsolver’s Advanced Technology
Ready to experience the future of big data ingestion?
Test drive Upsolver today!- Achieve seamless, continual data ingestion to your warehouse and lake
- Enjoy on-time, exactly-once, and strongly ordered data with Upsolver’s bulletproof technology
- Monitor and inspect your data with unparalleled observability
- Monitor and inspect your data with Upsolver’s powerful observability tools
In the table below, we compare Snowpipe Streaming to SQLake, our own data ingestion and transformation platform:
Comparing Snowpipe Streaming to Upsolver SQLake
| Snowpipe streaming | SQLake | |
| Streaming sources | Kafka, managed Kafka; other streaming sources via SDK | Kafka, Kinesis, database sources, CDC |
| Ingestion costs | Low (compute-based) | $99 per terabyte |
| Transformation costs | High | None |
| Targets | Snowflake tables | Snowflake, other databases (Redshift), data lakes, serverless query engines (Athena) |
| Implementation and configuration | Java SDK | SQL |
Summarizing Snowflake’s best practices for using the Snowpipe Streaming API
Snowpipe Streaming is a preview feature, and information about it is scarce. Based on what we found in official Snowflake documentation as well as in this post by a Snowflake consultancy, we can suggest:
- Custom Java application: Unless you’re using the Kafka connector, you’ll need to create a custom Java application capable of running continuously, recovering from failures, and handling errors. Capture errors using the response from the insertRow (single row) or insertRows (set of rows) methods.
- Aggregate data to reduce costs: To optimize costs and reduce your custom work building Java clients for each source, Snowflake recommends aggregating data from multiple sources using a Java or Scala application, and then loading data using the Snowflake Ingest SDK at higher flow rates to optimize costs.
- Use supported Java versions: Ensure that you use Java version 8 or higher when working with the Snowflake Ingest SDK.
- Adjust network firewall rules: As the SDK makes REST API calls to Snowflake, ensure that your network firewall rules allow connectivity to Snowflake.
- Ordering in channels: Snowpipe will maintain the ordering of rows and their corresponding offset tokens within a channel, but not across channels.
- Using offset tokens: Include offset tokens to track ingestion progress and ensure exactly once delivery. Use the getLatestCommittedOffsetToken method to retrieve the latest committed offset token for a specific channel.
- Data types and column settings: Ensure that your table schema does not include unsupported column settings such as AUTOINCREMENT, IDENTITY, non-NULL default column values, or GEOGRAPHY and GEOMETRY data types.
- Security: Key pair authentication is done via JSON Web Tokens (JWTs). Ensure that you follow key rotation best practices for added security. Store sensitive information such as private keys in encrypted forms or in a key management service (KMS).
- Handling updates: To modify, delete, or combine data, write the raw records to one or more staging tables and use continuous data pipelines to insert modified data into destination reporting tables.
- Monitor data load history and billing: Track your account’s data load history and billing information to stay informed about Snowpipe Streaming compute costs and per-second client ingestion time (as well as the compute costs of migrating from mixed tables).
Published in:
Blog
,
Building Data Pipelines