
Explore our expert-made templates & start with the right one for you.
Schema Evolution Guide: Handling Schema Drift Automatically
-
Ajay Chhawacharia
- Building Data Pipelines
- December 20, 2022
Data is rarely static; it is constantly changing, its schema constantly evolving. This is inevitable, but can create problems for downstream data applications. Let’s quickly review the concept of schema evolution, explain why schema drift occurs, and outline a solution.
What is Schema Evolution and Schema Drift?
Schema evolution is the process of managing changes in data schema as it evolves over time, often due to updates in software or changing business requirements, which can cause schema drift.
Software that produces data continues to be updated and the vendors that build the systems and tools we use to drive our business (an IoT sensor, a security camera, mobile device infrastructure, and so on) evolve and enhance the information and metrics they produce – often with little to no warning. When new data elements are added, or existing ones are modified, the schema can change (drift).
Why schema evolution can break data pipelines
Downstream targets such as data lakes and warehouses are blind to these changes. This leads to bad outcomes such as:
- New fields not propagating downstream.
- Changes to the meaning of existing fields (for example, updating a distance field from inches to centimeters or a boolean field from Yes/No to 1/0) that lead to incorrect results or the pipeline breaking.
- Unexpected changes to field names or data types.
And even after data engineers hustle reactively to incorporate changes in schema or semantics and ensure data targets have correct and complete data, they’ve addressed only half the problem: they’ve resolved future data ingestion issues, but inconsistencies or inaccuracies with historical data may still exist. To update historical data, data teams must replay and reprocess some or all of the data to ensure correctness not from the time of the fix but from the moment the schema changed.
Dealing with Data Drift: Traditional Approaches Using Spark-Based Tools
The traditional approach – for systems that lack automatic schema handling – is to reload historical data from the time of the change. While there are some tools and techniques available in the data engineering toolbox to help with this, each comes with its own unique implementation pros and cons, which requires a great deal of experimentation and testing.
In case you were wondering – and I’ll spare you the gory details – by default Apache Spark doesn’t apply schema evolution unless explicitly enabled using the mergeSchema property when reading files – for example:
spark.read.option("mergeSchema","true").parquet("location_to_your_data")
Although merging schema can be enabled globally by default, it’s a compute-intensive operation; per Spark documentation, use it with caution, as changing global settings could result in unintended consequences for all pipelines executing on the same Spark infrastructure.
Further, you must reconcile the corresponding schema in the metastore (Apache Hive or AWS Glue Data Catalog). For Glue Data Catalog you must create a Crawler, configure it to “update the table definition in the data catalog” and then rerun it. For Hive you must either alter the table schema for the staged table with appropriate ALTER DDL commands or leverage VIEW to join old and new staged tables. And to handle non-compatible schema drift such as a data type change, you may need to reprocess the entire data set.
In short, with the traditional approach you find yourself managing a growing number of configuration parameters across multiple systems, validating performance impact for varying workloads, and teaching your users data engineering best practices to get schema evolution just right.
Handling Schema Drift Automatically
We created Upsolver SQLake to eliminate the data engineering burden of creating and maintaining pipelines for moving and processing data in motion. SQLake makes it easy for users to develop data pipelines that combine both batch and stream processing using only SQL. One key area where we wanted to help was dealing with schema drift. SQLake retains your raw data on the underlying cloud object store. This gives you the ability to “time travel” to a previous state and replay source data with the new logic. Simply use a START_FROM timestamp in your modified job that references the time in the past at which you want the corrective reprocessing to start. The timestamp just needs to go back far enough to push corrected data to your output table.
SQLake automatically detects the schema of a variety of data sources, including changes when:
- A new column is added. SQLake’s table statistics view includes a “First Seen” property that provides the time when the column was first seen by SQLake.
- A column is dropped. The “Last Seen” table property displays the last time a column was seen. Note that, following best practices, SQLake doesn’t automatically remove columns from the target.
- A column is renamed.
- When the column name changes semantically– from name to fullname, for example – SQLake adds fullname as a new column in the target table. The new column would contain only the newly-added values and the old name column would retain old values.
- When the column name changes its case but there is no change in meaning – Name to name, for example – there is no downstream change because SQLake automatically converts all column names to lowercase.
- The data type of a column is changed. SQLake attempts to accommodate both old and new by casting compatible types, like
BIGINTtoSTRING. When modeling and transforming data from the staged raw form to an intermediate representation using the SQLake INSERT INTO job, a schema can be explicitly defined (in lieu of schema detection), enabling you to select which type to cast the incoming values (explicit cast).
How to use SQLake to Handle Schema Drift
Now I’d like to walk you through a specific example to demonstrate how SQLake approaches schema drift so you or your data team can ensure your platform remains in sync as data changes.
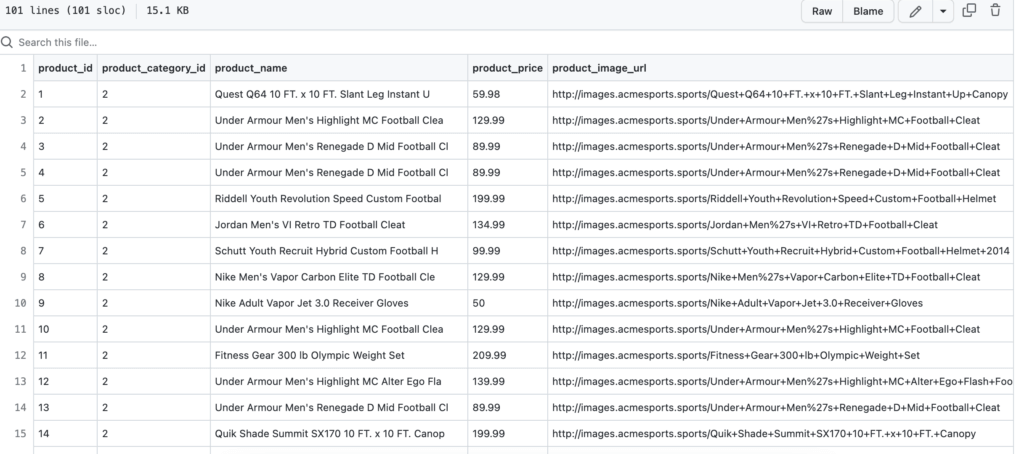
Assume we have a source that ingests data.csv files into Amazon S3 to hold product information. This sample dataset contains this schema:
- product id (int)
- product category id (int)
- product name (string)
- product price (double)
- product image url (string)
- product is returnable (yes/no)
- product has free shipping (TRUE/FALSE)
- product quantity on hand (double)
- product weight lb (int)
- product add date (date)
Here’s a partial snapshot:
For this exercise we create a simple SQLake pipeline that:
- Ingests the raw product data into a staging table.
- Performs transformations and aggregations on the data.
- Rounds the product price to 2 decimal places.
- Adds a calculated product handling column such that if product price is > $500, then “Premium,” else “Regular.”
- Loads the results into the data lake, queryable by Amazon Athena.
After building and executing this pipeline, I’ll demonstrate how SQLake responds when the source system adds a new data attribute to the data source and modifies the datatype of an existing attribute.
I encourage you to follow along and experience this on your own. Sign up for SQLake for free today (30 days unlimited use, no credit card required). All you need to follow along are two .csv files with sample data, the second including a modified schema:
- Use the first file for the initial data load for when the pipeline is deployed; place this initial dataset in your source location for SQLake to ingest and auto-infer the schema.
- Place the second file, which contains schema changes, in your source location only after SQLake job has processed the initial dataset. This way you can see how SQLake handles this dataset with the newly-evolved schema.
There are 7 straightforward steps to this exercise:
- Create a connection to your S3 source data.
- Create a staging table to hold raw product information. It will not include a schema, since SQLake auto-detects and adds all columns during ingestion.
- Create and run a job to ingest and load the raw data into the staging table.
- Preview schema of the staging table.
- Preview data in the staging table.
- Create an output table to hold enriched product information.
- Create a job to read from the staging table, apply transformations, and insert the enriched data into the product table.
Step 1: Create a connection to your S3 data source
CREATE S3 CONNECTION retail_s3_sample
        AWS_ROLE = <role ARN>
        EXTERNAL_ID = <external id>
        READ_ONLY = TRUE;
Step 2: Create a staging table to ingest raw data
This is just a placeholder table. There is no need to define columns and data types, as they are automatically detected and added.
CREATE TABLE <catalog>.<db>.products_staging
    PARTITIONED BY $event_date;
Step 3: Create a job to ingest and load raw data into the staging table
When you execute the job it begins to process data. There is no additional orchestration or scheduling needed.
CREATE JOB load_products_staging
    START_FROM = BEGINNING
    COMPUTE_CLUSTER = "Default Compute"
    CONTENT_TYPE = (
        TYPE = CSV
        INFER_TYPES = TRUE
 DELIMITER = ',')
    DATE_PATTERN = 'yyyy/MM/dd'
    AS COPY FROM S3 retail_s3_sample
                 BUCKET = 'upsolver-samples' PREFIX = 'schema-evolution/'
    INTO  <catalog>.<db>.products_staging;   //stage table created in step 2
You can execute the job by placing your cursor on the CREATE JOB statement and clicking the play icon (![]() ) to the left of the statement.
) to the left of the statement.
Now let’s inspect the table metadata from the catalog view. On the lefthand side of the screen, click default_glue_catalog, and expand your database element. Next, click to expand the product_staging table to inspect the columns.
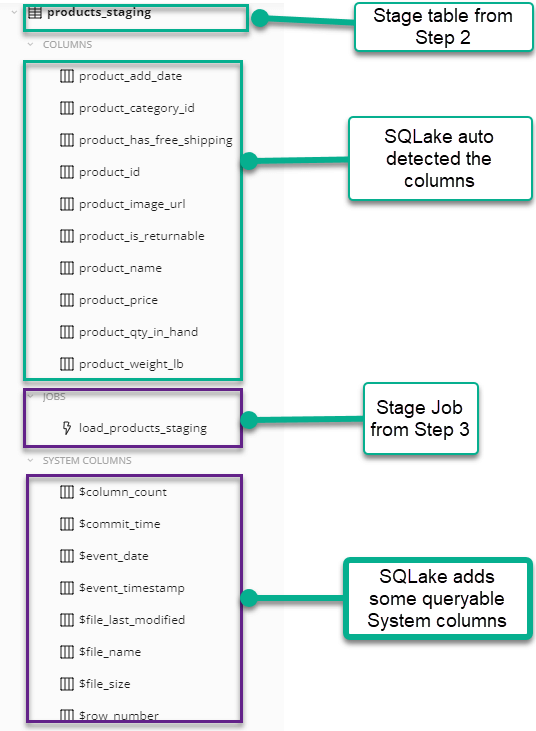
Step 4: Preview schema of the staging table
SQLake auto-infers the schema and also adds several system columns. To inspect the schema, click the table name in the catalog view. An information panel displays. To expand this panel, click the double arrow in the top right corner of the box.
The information panel exposes details about the volume and rate of events ingested into the table. It also enables you to inspect column names, types, and top values in each. If you created a table using a primary key, the key column also displays to make it easy for you to know how to join with this table. Finally, the First Seen and Last Seen columns reveal when columns were added or removed.

Step 5: Preview data in the staging table
From the SQLake worksheet you can run queries that execute against tables in the data lake – in this case, your staging table. To do that, simply type in a SQL query (Presto/Trino compatible syntax).
SELECT $event_timestamp",product_id,product_category_id,product_name,product_price,
        product_image_url,product_is_returnable, product_has_free_shipping, product_weight_lb,
        product_qty_in_hand
FROM <catalog>.<db>.products_staging LIMIT 5;

Step 6: Refining raw product information.
In this step, you create a target table, again without defining a schema. Then you create a job that transforms the raw data into a refined and enriched view to be stored in the target table for future analysis.
CREATE TABLE <catalog>.<db>.products (
     partition_date date)
    PARTITIONED BY partition_date
    COMPUTE_CLUSTER = "Default Compute";

CREATE JOB load_products
    START_FROM = BEGINNING
    ADD_MISSING_COLUMNS = TRUE
    RUN_INTERVAL = 1 MINUTE
    COMPUTE_CLUSTER = "Default Compute"
    AS INSERT INTO  <catalog>.<db>.products MAP_COLUMNS_BY_NAME
    SELECT
     product_id,
     product_category_id,
     product_name,
     ROUND(product_price,2) AS product_price_rounded,
     product_image_url,
     product_is_returnable,
     product_has_free_shipping,
     product_qty_in_hand,
     product_weight_lb,
     product_add_date,
     product_handling,
     $event_date as partition_date,
     $event_timestamp as event_timestamp
    FROM <catalog>.<db>.products_staging
    LET product_handling = IF_ELSE(product_price > 500, 'Premium', 'Regular')
    WHERE $commit_time BETWEEN run_start_time() AND run_end_time();
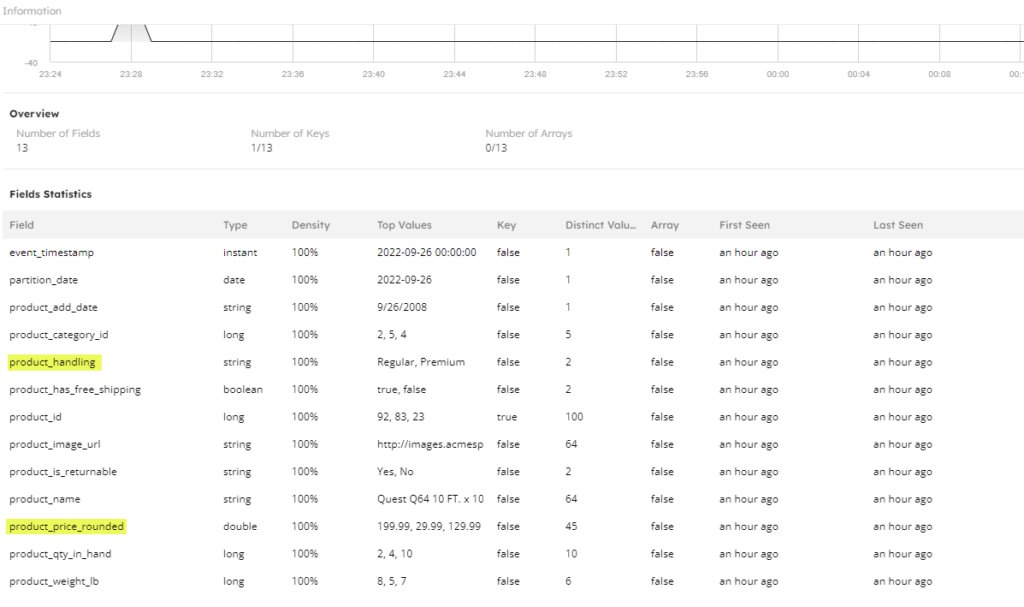
When you’ve created the table and data begins populating, you can inspect it from the catalog view. In the following screenshot the computed fields that we added are highlighted.
Run a SELECT * query against your refined table to inspect the value, as shown in the following screenshot:

Handling the Schema Change
OK. The pipeline you created has been working well. But you recently discovered there’s a schema change! The data producer has made some unannounced modifications:
- Added a new “product_category_name” column of type string
- “product_category_id” column has some new values of string type (initially it was long)
- “product_is_returnable” column now has values 0/1 instead of Yes/No (string to numeric).
- “product_has_free_shipping” column now has values 0/1 instead of True/False (boolean to numeric)
- “product_weight_lb” column now has decimal places (long to double)
- “product_add_date” column now has datetimestamp (date to datetime stamp)
With SQLake’s automatic schema detection and evolution, there’s no manual intervention required on your part to adapt to new schema changes. SQLake automatically detects the schema drift and:
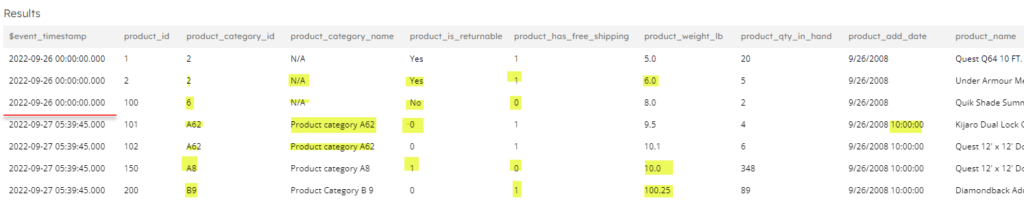
- Ingests the new product_category_name column. Previous product records will have N/A for this new column and new records will have the correct value. First seen metrics will show this attribute was added recently.
- Increases the total column count by 1 to reflect this new column addition.
- Adapts to the change in data type for product category id and typecasts the column to string (automatic typecasting happens because we didn’t explicitly declare the target schema and allowed SQLake to detect and evolve it).
- Adapts to the change in product_is_returnable values from Yes/No to 1/0 (notice how the column now has all 4 data values).
- Adapts to the change in product_has_free_shipping values from true/false to 1/0 (in this case, SQLake changes the data type from bool to long automatically to adapt to both old and new data and also all existing true/false values are changed to 1/0).
- Adapts to the change in data type for product_weight_lb and typecasts the column to double.
In the following screenshot, the evolved schema displays by the table statistics view in SQLake:

Executing a query against the table shows the new and old values mapped to the updated schema:
Summary – Upsolver SQLake Automatically Responds to Schema Drift
At ingestion time Upsolver SQLake discovers and infers schema automatically from a variety of data sources and data formats. As the data evolves, SQLake detects those changes, continues ingesting the newly-added and modified data elements without interruption, and automatically evolves the schema to reflect the changes, casting values where possible. Records of a previous type will be represented with a NULL value and new records with the most recent data type will include the correct value. When source columns are dropped, SQLake keeps the original columns intact with the original data but inserts NULL values for newly-added records. No data is lost and there is no need to reconnect to the data source system to capture any added/modified data elements.
SQLake also collects metrics for each data element, including vital information such as the exact time the new or modified data attribute appeared in the source. The $event_timestamp system column easily helps identify when the schema drift occurred, which enables the platform team to replay the data from a certain point, rather than the entire dataset from the beginning. Reprocessing just from the exact point in time, instead of replaying an entire week’s or month’s worth of data, significantly enhances efficiency in data availability and reduces time to market and processing cost. And it’s as easy as re-running a job with a given start time; just edit your transformations and outputs to incorporate these new data attributes, and then replay the respective data pipeline.
Try SQLakefor Free – Unlimited 30-Day Trial
Try SQLake for free for 30 days. No credit card required. Use your own data, or our sample data.
Visit our SQLake Builders Hub, where you can learn more about how SQLake works, read technical blogs that delve into details and techniques, and access additional resources.
Or continue the discussion and ask questions in our Slack Community.
Published in:
Blog
,
Building Data Pipelines