Explore our expert-made templates & start with the right one for you.
Parsing and Manipulating Date and Time Fields in SQL
SQLake makes it easy to convert date strings to timestamps
Converting strings to timestamps
Dealing with time-based fields can be a surprisingly tedious part of building a data pipeline. This post will cover features in Upsolver SQLake that greatly simplify the job.
If your source data contains dates as strings, you can convert them to proper timestamps using the EXTRACT_TIMESTAMP() function in your transformation jobs. EXTRACT_TIMESTAMP recognizes many variations of timestamp formats, and converts each into a timestamp data type of format ‘YYYY-MM-dddd hh:mm:ss’. When a time zone can be inferred from the source, EXTRACT_TIMESTAMP() converts the timestamp to UTC. Below are some examples of strings, along with the EXTRACT_TIMESTAMP output when executed on that string. For reference, the third example (1662542705000) is the number of seconds since epoch.
| <datestring> | EXTRACT_TIMESTAMP(<datestring>) |
| “March 9, 2022 08:04:32” | 2022-03-09 08:04:32.000 |
| “March 9, 2022 08:04:32 US/Eastern” | 2022-03-09 08:04:32.000 |
| 1662542705000 | 2022-09-07 09:25:05.000 |
| 2022-08-19 20:46:00 | 2022-08-19 20:46:00.000 |
In SQLake you can use this function in a transformation job as shown below. This example shows inserting into Snowflake. However, the same syntax can work for any transformation job:
CREATE SYNC JOB convert_datestring
   START_FROM = BEGINNING
   RUN_INTERVAL = 1 MINUTE
   ADD_MISSING_COLUMNS = TRUE
AS INSERT INTO SNOWFLAKE <connection>.<schema>.<table>
MAP_COLUMNS_BY_NAME
SELECT
   orderdate AS orderdate_string,
   EXTRACT_TIMESTAMP(orderdate) AS orderdate_converted
FROM default_glue_catalog.database_e809da.orders_raw_data
WHERE $event_time BETWEEN RUN_START_TIME() AND RUN_END_TIME();
Truncating dates to specific intervals
Many transformations require parsing timestamps to extract date parts, or truncating timestamps to a specific interval – for example, hour, day, week, and so on.
You can use the DATE_TRUNC(<interval>, <timestamp>) function to truncate a timestamp to a specific interval. The table below shows a few examples of available intervals, and how the DATE_TRUNC function works with each.
| <timestamp> | <datepart> | DATE_TRUNC(<datepart>, <timestamp>) |
| 2022-03-09 08:04:32.000 | ‘hour’ | 2022-03-09 08:00:00.000 |
| 2022-03-09 13:04:32.000 | ‘minute’ | 2022-03-09 13:04:00.000 |
| 2022-09-07 09:25:05.000 | ‘month’ | 2022-09-01 00:00:00.000 |
In SQLake, you can use this function in a transformation job, as shown below. Note the additional use of EXTRACT_TIMESTAMP to convert the orderdate string into the necessary timestamp data type:
CREATE SYNC JOB truncated_dates
   START_FROM = BEGINNING
   RUN_INTERVAL = 1 MINUTE
   ADD_MISSING_COLUMNS = TRUE
AS INSERT INTO default_glue_catalog.database_e809da.truncated_dates MAP_COLUMNS_BY_NAME
SELECT
   orderdate AS orderdate,
   DATE_TRUNC('hour', EXTRACT_TIMESTAMP(orderdate)) AS orderdate_hour,
   DATE_TRUNC('day', EXTRACT_TIMESTAMP(orderdate)) AS orderdate_day,
   DATE_TRUNC('week', EXTRACT_TIMESTAMP(orderdate)) AS orderdate_week,
   DATE_TRUNC('month', EXTRACT_TIMESTAMP(orderdate)) AS orderdate_month
FROM default_glue_catalog.database_e809da.orders_raw_data
WHERE $event_time BETWEEN RUN_START_TIME() AND RUN_END_TIME();
Converting UTC time to a specific time zone
When users build data products via transformation, they often request times to be reflected in specific time zones. You can use the ADD_TIME_ZONE_OFFSET() function to convert a time into that of a specific time zone. The ADD_TIME_ZONE_OFFSET(<timestamp>,<timezone>) function takes two parameters:
- the timestamp you wish to convert
- the time zone offset used for conversion.
The time zone can be reflected in several ways, including ‘+4:00‘ or ‘America/New_York’, or any of the formats accepted by Java’s ZoneId.of method.
The table below shows a few different input parameters, and the effect that ADD_TIME_ZONE_OFFSET(<timestamp>,<timezone>) has:
| <timestamp> | <timezone> | ADD_TIME_ZONE_OFFSET(<timestamp>,<timezone>) |
| timestamp ‘2018-03-10 08:55:12.456’ | +02:00′ | timestamp ‘2018-03-10 10:55:12.456’ |
| timestamp ‘2018-03-10 08:55:12.456’ | ‘America/New_York’ | timestamp ‘2018-03-10 03:55:12.456’ |
In SQLake you can use this function in a transformation job, as shown below. Note the additional use of EXTRACT_TIMESTAMP() to convert the orderdate into the necessary timestamp data type:
CREATE SYNC JOB timezone_conversion
   START_FROM = BEGINNING
   RUN_INTERVAL = 1 MINUTE
   ADD_MISSING_COLUMNS = TRUE
AS INSERT INTO default_glue_catalog.database_e809da.timestamp_timezones MAP_COLUMNS_BY_NAME
SELECT
   orderdate as orderdate,
   ADD_TIME_ZONE_OFFSET(EXTRACT_TIMESTAMP(orderdate), '+02:00') AS orderdate_plus2,
   ADD_TIME_ZONE_OFFSET(EXTRACT_TIMESTAMP(orderdate), 'America/New_York') AS orderdate_new_york
FROM default_glue_catalog.database_e809da.orders_raw_data
WHERE $event_time BETWEEN RUN_START_TIME() AND RUN_END_TIME();
Formatting timestamps
If your transformation requires you to format a timestamp into a specific string format, the FORMAT_DATETIME(<timestamp>,<format>) function can help. The format strings should be compatible with the JodaTime pattern, as documented here: http://joda-time.sourceforge.net/apidocs/org/joda/time/format/DateTimeFormat.html
Below you can see a few examples of formatting timestamps using different format strings:
| <timestamp> | <format> | Output |
| timestamp ‘2017-09-25 22:11:00’ | ‘yyyy/MM/dd HH:mm:ss.SSS’ | 2017/09/25 22:11:00.000 |
| timestamp ‘2018-03-10 08:12:45’ | ‘yyyy/MM/dd’ | 2018/03/10 |
| timestamp ‘2019-10-20 08:55:12.450’ | HH:mm:ss.SS’ | 08:55:12.45 |
| timestamp ‘2018-03-10 08:55:12.450’ | E’ | Sat |
In SQLake you can use this function in a transformation job, as shown below. Note the additional use of EXTRACT_TIMESTAMP() to convert the orderdate into the necessary timestamp data type:
CREATE SYNC JOB timestamp_format
   START_FROM = BEGINNING
   RUN_INTERVAL = 1 MINUTE
   ADD_MISSING_COLUMNS = TRUE
AS INSERT INTO default_glue_catalog.database_e809da.timestamp_formatted MAP_COLUMNS_BY_NAME
SELECT
   orderdate as orderdate,
   FORMAT_DATETIME(EXTRACT_TIMESTAMP(orderdate),'yyyy/MM/dd HH:mm:ss.SSS') AS format1,
   FORMAT_DATETIME(EXTRACT_TIMESTAMP(orderdate),'yyyy-MM-dd') AS format2,
   FORMAT_DATETIME(EXTRACT_TIMESTAMP(orderdate),'HH:mm:ss.SS') AS format3
FROM default_glue_catalog.database_e809da.orders_raw_data
WHERE $event_time BETWEEN RUN_START_TIME() AND RUN_END_TIME();
Using Date Functions in SQLake to Transform Data
With SQLake, there are just 4 straightforward steps:
To run it:
- Create a connection to Amazon S3 with sample data
- Create a staging table and job to ingest raw data
- Create a target table to hold transformed data
- Create transformation job that uses various date functions to transform the data
To help demonstrate how to use various date functions, we will use sample data hosted by Upsolver and made available through S3.
1. Create a connection to Amazon S3 with sample data
Create a connection to S3. The IAM role in the following snippet is provided for you to access the data in S3;
CREATE S3 CONNECTION upsolver_s3_samples
   AWS_ROLE = 'arn:aws:iam::949275490180:role/upsolver_samples_role'
   EXTERNAL_ID = 'SAMPLES'
   READ_ONLY = TRUE;
2. Create a staging table and job to ingest raw data
Create a staging table in the data lake to hold the raw data. This step is simple and you don’t need to know the raw schema; SQLake automatically detects it and updates the AWS Glue Data Catalog.
Create the staging table in the AWS Glue Data Catalog. Note that you must update the <db_name> to use your database name:
REATE TABLE default_glue_catalog.<db_name>.orders_raw_data()
PARTITIONED BY $event_date;
We’re using the $event_date system column to partition the staging table. This column contains the original date the event was generated (if available in the event), or one that is auto-generated by SQLake when the event is ingested.
Once the table is created, we need to create an ingestion job that copies the raw events from the source S3 bucket into the target table. SQLakel converts the data to columnar format, partitions it, and manages it over time to ensure best query performance.
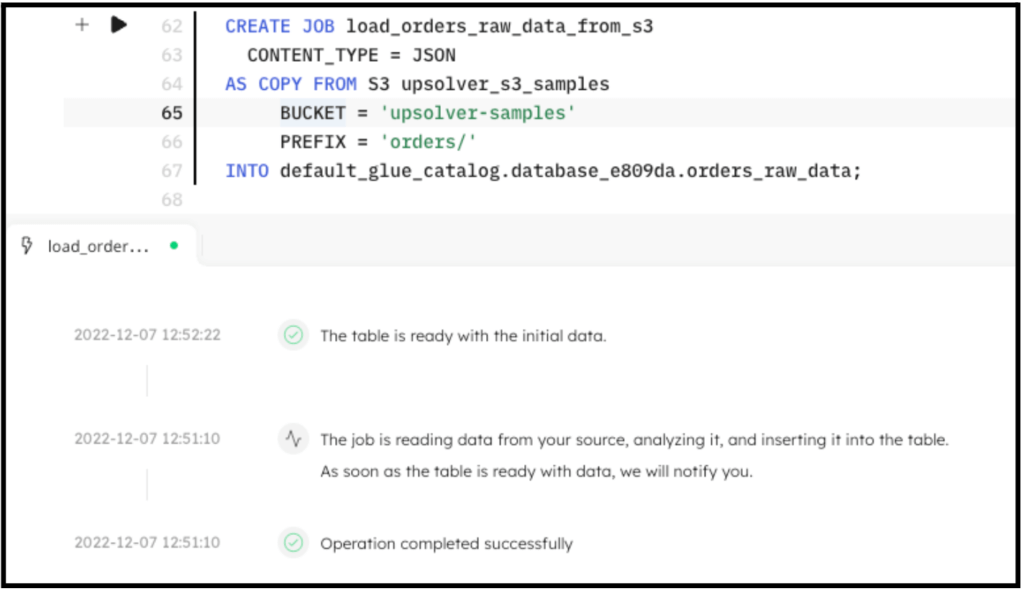
Create the ingestion job to copy raw data into the target table:
CREATE SYNC JOB load_orders_raw_data_from_s3
  CONTENT_TYPE = JSON
  AS COPY FROM S3 upsolver_s3_samples
     BUCKET = 'upsolver-samples'
     PREFIX = 'orders/'
  INTO default_glue_catalog.<db_name>.orders_raw_data;
The following screenshot shows the execution of the ingestion job. In the console, SQLake reports the progress and notifies you when the data is available to query.
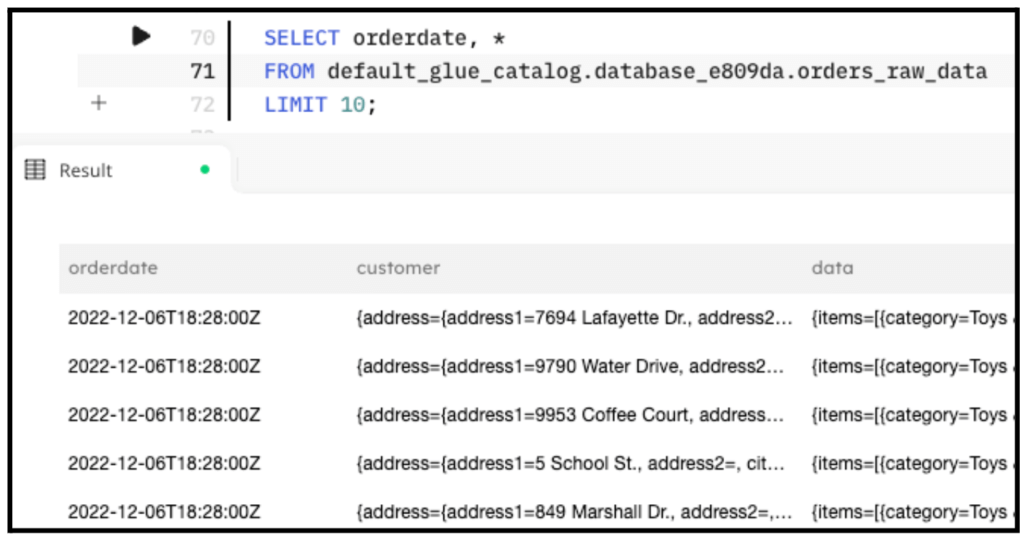
You can easily query the staging table directly from the SQLake worksheet. For example:
SELECT orderdate, *
FROM default_glue_catalog.<db_name>.orders_raw_data
LIMIT 10;
The following screenshot shows the results of the query. You can see the orderdate string, which we use in the next step.
3. Create a target table to hold the transformed data
Now that the raw data is staged, create the target table in the AWS Glue Data Catalog to hold the enriched data.
Create the target table:
CREATE TABLE default_glue_catalog.<db_name>.transformed_dates (
  partition_date date
)
PARTITIONED BY partition_date;
Notice that we’re defining partition_date column as the partition column for this table. This column will get its value from the $event_time column.
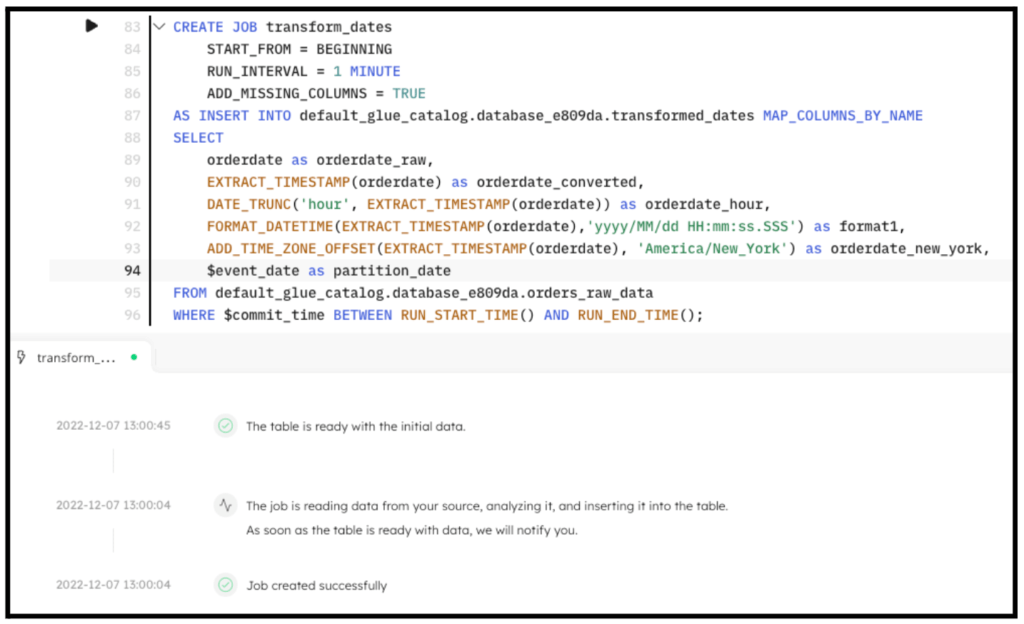
4. Create a transformation job that uses USER_AGENT_PARSER to enrich the data
This is the step where the interesting work is performed. We create a transformation job that uses the several date functions to transform the orderdate field.
Create the transformation job:
REATE SYNC JOB transform_dates
   START_FROM = BEGINNING
   RUN_INTERVAL = 1 MINUTE
   ADD_MISSING_COLUMNS = TRUE
AS INSERT INTO default_glue_catalog.<db_name>.transformed_dates MAP_COLUMNS_BY_NAME
SELECT
   orderdate AS orderdate_raw,
   EXTRACT_TIMESTAMP(orderdate) AS orderdate_converted,
   DATE_TRUNC('hour', EXTRACT_TIMESTAMP(orderdate)) AS orderdate_hour,
   FORMAT_DATETIME(EXTRACT_TIMESTAMP(orderdate),'yyyy/MM/dd HH:mm:ss.SSS') AS format1,
   ADD_TIME_ZONE_OFFSET(EXTRACT_TIMESTAMP(orderdate), 'America/New_York') AS orderdate_new_york,
   $event_date AS partition_date
FROM default_glue_catalog.<db_name>.orders_raw_data
WHERE $event_time BETWEEN RUN_START_TIME() AND RUN_END_TIME();
By executing the previous code in SQLake, the job is created. After a couple minutes the data is fully transformed and ready to query. The following screenshot shows the execution of the job.
5. Query the target table to see the results of the transformation:
SELECT *
FROM default_glue_catalog.<db_name>.tranfsormed_dates
LIMIT 50;
The output of the query looks similar to the following screenshot:

Summary
That’s it!!
In just a few minutes and with several lines of SQL you were able to ingest data from S3 into the data lake, perform several transformations on date fields, and provide a table suitable for analytics, reporting, or additional downstream transformations. SQLake makes it easy to work and extract meaning from data quickly. You can find more useful date functions in the documentation page.
For additional documentation, along with a full template that you can run for yourself in SQLake, please check out the following blog: https://www.upsolver.com/blog/how-to-format-fix-and-convert-timestamps-in-your-data-pipelines
Get started today for free with sample data or bring your own.
Discover how companies like yours use Upsolver
Data preparation for Amazon Athena.
Browsi replaced Spark, Lambda, and EMR with Upsolver’s self-service data integration.
Read case studyBuilding a multi-purpose data lake.
ironSource operationalizes petabyte-scale streaming data.
Read case studyDatabase replication and CDC.
Peer39 chose Upsolver over Databricks to migrate from Netezza to the Cloud.
Read case studyReal-time machine learning.
Bigabid chose Upsolver Lookup Tables over Redis and DynamoDB for low-latency data serving.
Read case study
Start for free - No credit card required
Batch and streaming pipelines.
Accelerate data lake queries
Real-time ETL for cloud data warehouse
Build real-time data products