Explore our expert-made templates & start with the right one for you.
How to Implement CI/CD for your Data Pipelines with Upsolver SQLake and Github Actions
-
 Roy Hasson
- Building Data Pipelines
- January 10, 2023
Continuous integration and continuous deployment or delivery (CI/CD) are common practices in software development. However, companies struggle to implement these practices for the ETL code they use to model, transform, and load critical data into the data lake and data warehouse. This data is used to fuel business decisions, support machine learning models, and much more. It is expected to be accurate, fresh, and of high quality.
There are two primary challenges with implementing CI/CD processes for ETL:
- ETL code does not stand alone. It operates on data with a schema that tends to evolve over time. This means that for code to be properly tested and validated, it has to process either production data or sample data that is very close to it and is frequently updated
- To execute your ETL code, you need to stitch together multiple components. In a simple use case, you must:
- load the schemas of your data into the data catalog
- configure a job scheduler, such as Apache Airflow, with the correct sequence of operations (DAG) to execute your jobs in the correct order
- deploy and configure the execution environment, such as Apache Spark, to run your ETL code and produce a result.
- execute some queries against the output to validate that your results are accurate and match your expectations
Traditional Approaches to CI/CD Don’t Work for ETL
Traditional CI/CD processes used by software developers bundle your code together with the execution environment into a Docker container that gets executed by a host system such as Jenkins or Github Actions. If something fails, either during the build process or execution process, you are notified so you can take appropriate action. But with ETL code, bundling the execution environment is not ideal. There are too many components and dependencies, and it is difficult to connect real production data with the ephemeral execution environment, so you’re forced to use sample or mock data.
Testing your code is a critical part of continuous integration (CI) and is a must before proceeding with continuous deployment (CD). However, as mentioned above, it’s very difficult to validate the behavior of your ETL code against the variable nature of production data. In majority of cases, ETL code requires ingesting data from multiple sources of varying types, such as Amazon S3 using CSV and JSON, or Apache Kafka encoded as JSON records. It also requires complex transformations, such as joins and user-defined functions, to prepare, model, and clean the data. A common example is ad attribution. To properly attribute ad impressions (views) to clicks and properly track the user across multiple devices as they move from the laptop to the phone and back, you must correlate several bits of information into a unique session – a technique called sessionization. This is difficult to do, requires many experiments and iterations to get right, and most definitely requires access to production data to be evaluated against the many permutations of user session signatures.
Write a query > Get a pipeline
Introducing SQLake
Reliable data pipelines for batch, streaming and CDC jobs.
Test Drive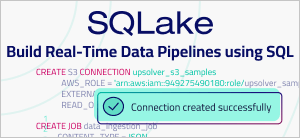
You can test basic behavior using sample data, but to fully and properly test your ETL code you must use production data.
ETL Jobs Must be Orchestrated, too
In addition to building your CI/CD process to test and deploy your ETL code, you also need to build a similar process to test and deploy the Airflow DAGs you use to orchestrate and schedule the ETL jobs. Deploying bad DAGs can wreak havoc on your users and your business.
To effectively test and deploy your data pipelines it is a best practice to combine the CI/CD processes of ETL code with those of Airflow DAGs. This enables you to test and deploy end-to-end pipelines. However, implementing this is complex and requires a significant amount of custom development and scripting to get right and make it easy to use by non-engineers. Unless you don’t care if your users are not following best practices, but I know you do.
I see a growing number of data engineering teams investing in building custom infrastructure and tools to make testing and deploying ETL code and DAGs simpler for users to enable self-service at their companies. However, the results are more tech-debt, more infrastructure to manage and more places for things to break. This is not a good investment of time and resources and ultimately leads to frustration and burnout. Furthermore, companies that don’t have data engineers struggle to implement and scale patterns for self-service. This, again, results in more tech debt, lots of data outages in production, and possibly data breaches kas well. For example, if your ETL code didn’t mask a sensitive field that made its way into a table with access to the entire company (that may have happened to me once 🤦).
Improving Collaboration and Ownership with SQLake
It’s well understood that if you pass a task to someone with little to no familiarity with the context or goals of the project, that task is bound to fail. Yet over the years, companies established a pattern in which data-related tasks are handed over to the data engineering team, oftentimes with little context, to implement. The data team spends weeks or months asking questions and trying to decipher what data to ingest and how to process it to produce effective results that meet the business needs. They are then required to manage and maintain this data, all the while being disconnected from how this data is being used.
When we built Upsolver SQLake, it was important to us to encourage better collaboration between data producers and data consumers. To do this, we redesigned how data pipelines are created. We separated each individual step of the pipeline and ties them together through magic – or, more specifically, intelligent job orchestration and scheduling. This encourages responsible reuse of data sources and transformations, provides visibility into how datasets are created (the business logic) and related (job dependency DAG), and provides a common place for data producers and consumers to collaborate, holding each other accountable for data quality and reliability.
Building a Data Product Using Github Actions and SQLake
Before we dive into how to build a reliable data product using SQLake, you should spend a few minutes familiarizing yourself with Github Actions, an automated, highly customizable workflow management and execution engine built into your Github repository. It’s similar to Jenkins and CircleCI, but is fully-hosted and managed by Github.
Another concept to note is that entities created in SQLake, such connections, tables, and jobs, are persistent and active the moment they are executed successfully. This means that once a job is created, it is running, listening to new events, transforming them, and updating the output table. Any and all dependencies are inferred and DAGs are automatically created behind the scenes.
There are multiple ways to develop, test, and deploy data pipelines. In this post, I want to highlight two patterns that work well with Github Actions and SQLake.
The first pattern, which I’ll dive into in more detail, requires data producers and data consumers to maintain separate repositories for their respective code. Producers develop and manage code to connect to varying data sources such as Kafka streams or S3 objects, as well as the processing jobs to ingest, model, and stage the source data. Consumers will develop and manage code to consume from the staged tables and produce business-specific views of the data to meet their needs. This pattern gives direct ownership to each team and delineates their responsibilities so there is no confusion. Because both code bases execute on SQLake, users can always inspect and monitor each other’s jobs to ensure that data quality, schema, and SLA all meet their needs.
The second pattern, which I’ll leave as an exercise for the reader, requires data producers and consumers to collaborate in a monorepo, a single repository containing one or more projects that may or may not be related. Monorepos are popular because they:
- provide visibility into what others are building
- enable collaboration and discoverability
- encourage ownership
Monorepos aren’t perfect; they have some drawbacks such as contributing changes with dependencies in multiple projects, resolving merge conflicts, and simply needing to manage a large code base.
Creating your Repository
There are many ways to structure your repo, but I’ll suggest one that has worked for me and my customers. You can clone https://github.com/rhasson/cicd_sqlake if you want to follow along or create your own repo and tailor it to fit your needs.
We’ll structure our folders in the following way:
dataplatformrepo
  -- .github/workflows/
  -- src/
    -- 001-connections
    -- 002-schemas
      -- staging
      -- intermediate
      -- mart
    -- 003-ingestion
      -- staging
      -- intermediate
  -- tests/
    -- staging
    -- intermediate
    -- mart
  -- README
  -- LICENSE
  -- .gitignore
The .github/workflows folder contains our Github Action YAML file that defines the CI/CD workflow. The src/ folder contains all of the connections, schema definitions, and SQL jobs for ingestion and modeling. The tests/ folder contains unit and end-to-end tests written in SQL to validate quality and accuracy of the datasets. I sub-divided the src/ top-level folder into connections, schemas, and ingestion folders; within each of those I further subdivided into staging, intermediate, and mart (where applicable). (We use “Mart” here as shorthand for datamart, the dataset modeled and transformed for a business use case.)
The connections folder stores the SQL files that define the connection authentication information, such as IAM roles, username and passwords and connection strings. These connections need to be configured only once and they persist until they are dropped.
The schema folder stores the SQL files that define the data contract or schema for staging, intermediate, and mart tables. This is a single place to validate the data contracts between the producers of data and their consumers. Some tables may not include a schema and choose to use dynamic schema detection, but others – specifically in intermediate and mart folders – should have a defined schema.
The ingestion folder contains staging and intermediate jobs, again written in SQL, that ingest, clean and model new datasets.
Learn more about how to structure your data lake and the meaning behind this approach in the Best practices to organize your data lake blog post.
Setting the stage
Through the rest of this post I will be referring to data producers and data consumers. Each one is responsible for a different part of the data pipelines. This is intended to illustrate a best practice for teams to collaborate when building data products – datasets that are reliable, high quality, and maintainable with clearly defined accountable owners. The responsibilities of each team (producers and consumers) is up to your organization to decide, but I will provide some guidance for what I’ve seen be successful at other companies.
Additionally, I’m developing the pipeline using Visual Studio Code with Github integration so that all of my code changes are tracked in Github.
Before You Begin – Understanding SQLake Github Action
Before we can implement the CI/CD pipeline, we must look at the Github Action that executes the code against SQLake. I created a Github Action for SQLake that leverages the SQLake CLI to execute SQL commands against the SQLake Cloud offering. Before you start, I encourage you to sign up to SQLake so you can follow along. It’s completely free for 30 days!
The following is a basic Github Action YAML file that is included in your repo under .github/workflows/. This YAML file, named development.yml, describes the steps we want our CI/CD flow to take in order to execute the SQL commands on SQLake.
name: development

on:
  push:
	branches: [dev]

jobs:
  execute_sql:
	name: Execute SQL
	environment:
  	name: development
	if: github.event.ref == 'refs/heads/dev
	runs-on: ubuntu-latest
	steps:
  	- name: Checkout
    	  uses: actions/checkout@v3
    	  with:
      	    fetch-depth: 0
  	- name: Get changed files
    	  id: cf-step
    	  uses: tj-actions/changed-files@v29.0.7
    	  with:
      	    separator: ","
      	    files: |
        	**.sql
  	- name: Execute changed or added files
    	  uses: rhasson/sqlake_action@main
    	  with:
       	file_list: ${{ steps.cf-step.outputs.all_changed_files }}
       	api_key: ${{ secrets.API_KEY }}
       	api_endpoint: 'https://api.upsolver.com'
  	- name: Print Results
    	  run: |
      	    cat ${GITHUB_WORKSPACE}/execution_output.md >> $GITHUB_STEP_SUMMARY
When code changes are pushed to the dev branch, the jobs defined in the YML file execute. Each job performs the following steps:
- Validates that the branch being used is dev. If not, the workflow is ignored.
- Checks out the entire repo
- Runs tj-changed-files Action that inspects the repo and returns a list of all files that change by the most recent operation git push operation.
- Runs the SQLake Action passing in the list of changed files, API key, and the SQLake API endpoint. The Action parses the SQL files and executes them in sequence.
- Displays a report of all executed commands and their results
Also note that I’m using Github Environments and Secrets to manage deployment-specific configuration within a development target. For example, my SQLake API key is kept as a secret in the Development environment and exposed to the Action as the API_KEY variable. You can generate any API key by following the instructions in the API integration documentation.
1. Deploying your first data source connector
The first thing a data producer must do is create a connection to their source system. With SQLake, connecting to sources is divided into two parts:
- A connection – holds credential information to the source system
- An ingestion job – moves data from the source into the data lake staging table.
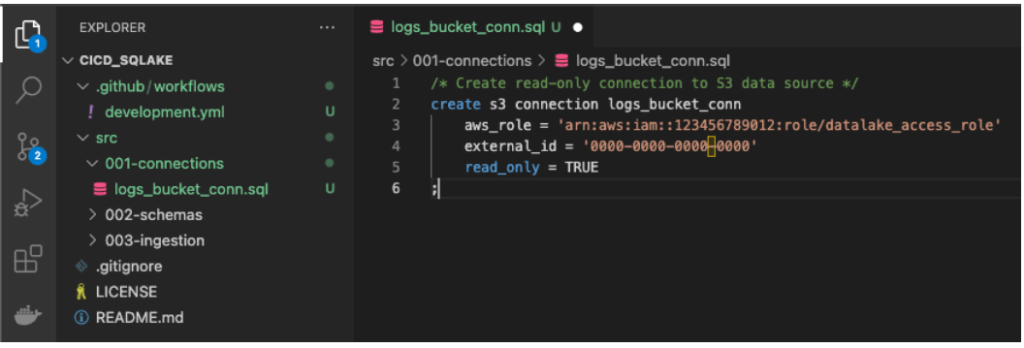
Inside the 001-connections folder, create a file named logs_bucket_conn.sql. This file contains a SQL statement to create a SQLake connection to Amazon S3.
The following is an example of how you would create a connection to S3:
CREATE S3 CONNECTION logs_bucket_conn

  AWS_ROLE = 'arn:aws:iam::123456789012:role/datalake_access_role'

  EXTERNAL_ID = '0000-0000-0000–0000'
The connection defines the AWS IAM role ARN and the External ID. The role gives SQLake permissions to read and write from a specific S3 bucket. You don’t need to define bucket level access controls in SQLake; access is managed by the IAM policies of your role. If SQLake fails to create a connection it’s usually because of IAM permissions, but once successfully created, the connection is available to use.
The following is a screenshot from my VSCode IDE, showing the folder structure and SQL command to create a connection:
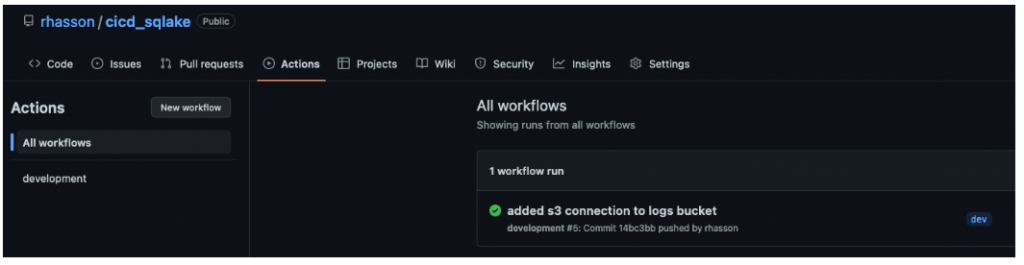
Save the file and push the changes to your dev branch. Once the changes have been pushed, open your repository in Github and click the Actions tab. You should see something like the following:
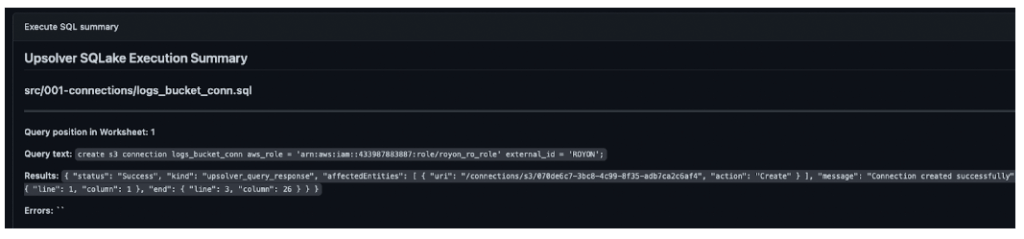
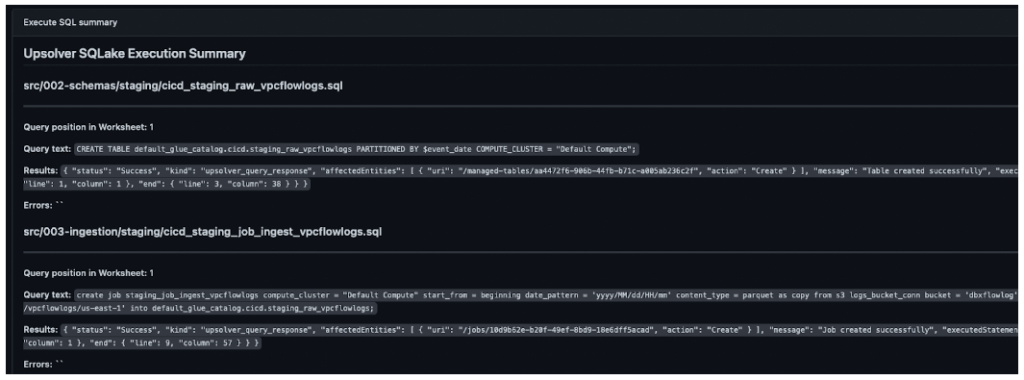
Click into the workflow to display the output summary showing the successful creation of the S3 connection, as in the following screenshot:
2. Ingesting data from S3 to a staging table
With a connection defined to S3, we want to ingest the source data and stage it in the data lake. This can be accomplished using a SQLake copy from job. This job simply reads from the source, converts to Apache Parquet format, and stores the data in S3. It also updates the AWS Glue Data Catalog with the schema and partition information so you have access to the latest data at all times. One step we must take before creating the job is to define the target table where data will be written.
In your IDE, navigate to 002-schema/staging/ and create a new file called cicd_staging_raw_vpcflowlogs.sql where you’ll write the following SQL statement to create the table:
CREATE TABLE default_glue_catalog.cicd.staging_raw_vpcflowlogs
  PARTITIONED BY $event_date
  COMPUTE_CLUSTER = "Dev Cluster"
;
Before pushing your changes, let’s also create the copy from job to write data into the target table. Navigate to 003-ingestion/staging/ and create a new file called cicd_staging_job_ingest_vpcflowlogs.sql where you’ll write the following SQL statement to create the job:
CREATE JOB staging_job_ingest_vpcflowlogs
  COMPUTE_CLUSTER = "Dev Cluster"
  START_FROM = beginning
  DATE_PATTERN = 'yyyy/MM/dd/HH/mm'
  CONTENT_TYPE = parquet
  AS COPY FROM S3 logs_bucket_conn
	BUCKET = 'dbxflowlog'
	PREFIX = 'AWSLogs/123456789012/vpcflowlogs/us-east-1'
  INTO default_glue_catalog.cicd.staging_raw_vpcflowlogs
;
Note that in both the statements we set the COMPUTE_CLUSTER property to use a development cluster when running the job. This allows us to isolate dev work from production work. When we deploy the pipeline to production, we can change this property to point to the production cluster. Additionally, we are using the default Glue Data Catalog in the data platform’s AWS account, our development environment. We can create a SQLake connection to a Glue Data Catalog in another AWS account – the production account – so when we deploy to production we write tables into the production catalog instead.
Save the files, push to your dev branch on Github, and let the Github Action deploy the changes to your SQLake development environment. When the action completes you can inspect the Summary output, which should look similar to the following:
3. Modeling the raw data to create an intermediate table
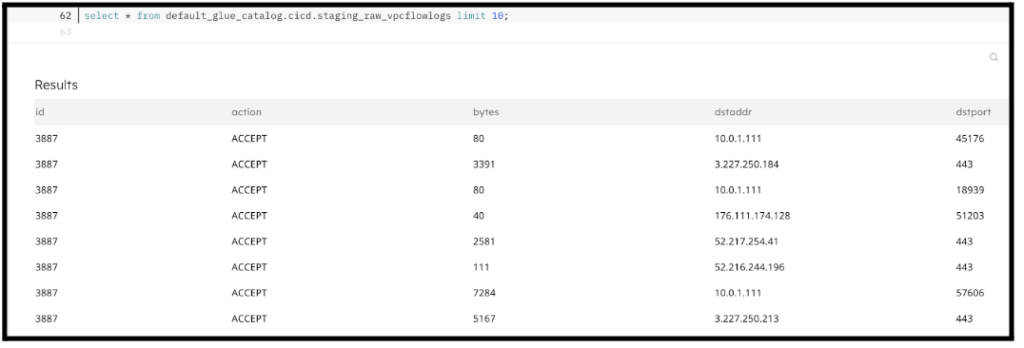
At this point, the table is ready to be queried by data lake query engines such as Amazon Athena and Starburst. In some cases the raw data is all you need and the staging tables can be shared with downstream users – for example, for data scientists to train ML models. You can even query your tables directly from a SQLake Worksheet using the Presto/Trino syntax, as you see below:
However, in most cases it benefits the producer to model their data so it’s easier for business users to understand. This is easily accomplished in SQLake by creating a transformation job that reads from the staging table, transforms and models the data, and writes the output to an intermediate table.
The sample data we’re using is AWS VPC Flow Logs that track traffic in and out of your AWS VPC. These logs are useful to troubleshoot connectivity issues and monitor network traffic to your service or application.
First, navigate to 002-schemas/intermediate and create a file named cicd_inter_model_flowlogs.sql. This file contains our table definition with a static schema. This static schema defines our data contract between producer and consumer.
Following is the table definition statement:
CREATE TABLE default_glue_catalog.cicd.inter_model_flowlogs(
	source_account_id string,
	action string,
	bytes_sent string,
	source_ip_address string,
	source_port string,
	destination_ip_address string,
	destination_port string,
	first_packet_received_time timestamp,
	last_packet_received_time timestamp,
	interface_id string,
	log_status string,
	num_packets_transferred bigint,
	protocol double,
	flowlogs_version string,
	dt date
)
PARTITIONED BY dt
TABLE_DATA_RETENTION = 5 DAYS
COMPUTE_CLUSTER = "Default Compute"
Second, navigate to 003-ingestion/intermediate and create a file named cicd_inter_job_model_flowlogs.sql. This file contains the below code to transform the raw data and load to the target intermediate table defined in the previous step.
Following is the job creation statement:
CREATE JOB load_vpcflowlogs
	COMPUTE_CLUSTER = "Default Compute"
	START_FROM = NOW
	ADD_MISSING_COLUMNS = TRUE
	AS INSERT INTO default_glue_catalog.cicd.inter_model_flowlogs
	MAP_COLUMNS_BY_NAME
	SELECT
  	account_id AS source_account_id,
  	action,
  	bytes AS bytes_sent,
  	srcaddr AS source_ip_address,
  	srcport AS source_port,
  	dstaddr AS destination_ip_address,
  	dstport AS destination_port,
  	FROM_UNIXTIME("start"::bigint) AS first_packet_received_time,
  	FROM_UNIXTIME("end"::bigint) AS last_packet_received_time,
  	interface_id,
  	log_status,
  	packets AS num_packets_transferred,
  	protocol,
  	version AS flowlogs_version,
  	DATE(FROM_UNIXTIME("start"::bigint)) AS dt
	FROM default_glue_catalog.cicd.staging_raw_vpcflowlogs
	WHERE $commit_time BETWEEN run_start_time() AND run_end_time();
Save both files and push the changes to your dev branch. The Github Action should recognize the changes and execute them on SQLake automatically. Inspect the Actions tab on Github.com when you browse your repo to make sure the workflow succeeded. If it failed, correct the error and git push again. If you have more questions or you get stuck, join the Upsolver Slack community and we’ll be happy to help.
4. Building data apps to enable business use cases
Let’s recap what we’ve done up to this point:
- We started by setting up a Github repo to hold our SQL commands to create connections, tables, and jobs.
- We separated them into staging, intermediate, and marts representing the different stages of data refinement.
- We connected to S3, ingested and staged some data, then modeled it to make it readable and understandable by everyone.
Now we’re at a point where we can build data apps that use this dataset to answer business questions.
Data apps in this context means that we are creating an always-on ETL job that implements a specific business use case. We’re making our code composable with a use case per data app so others can build on top of our data app if they see value in the output we generate.
The process to build a data app is very similar to the steps we took in Section 3 above (Modeling the raw data). We will create the target table with a predefined data contract or schema, then create a transformation job that will aggregate and produce a set of metrics we need for our use case.
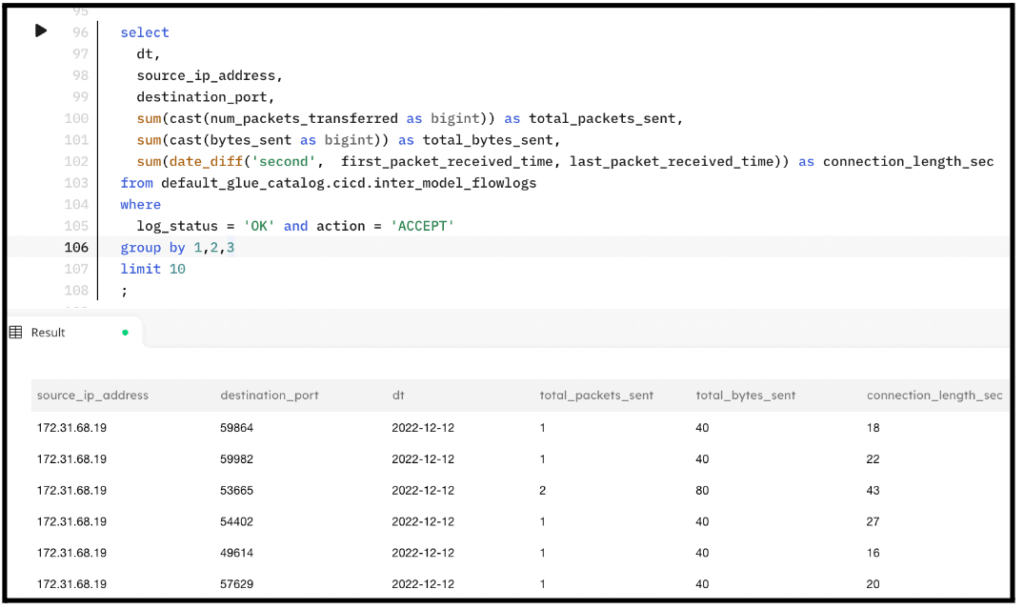
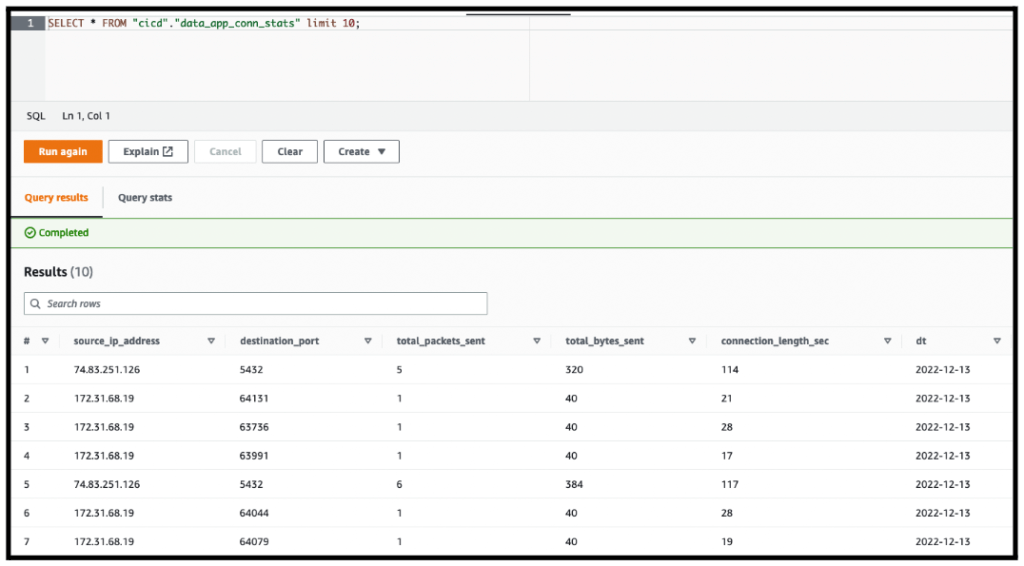
In this example, our dataset is AWS VPC Flow Logs. We want to report the total number of bytes and packets sent, plus the duration the connection was active, grouped by the source IP address, target port, and date. Below is an example output when executing this query in SQLake:
Let’s create the target table to store these metrics. We place this SQL statement in the 002-schema/mart folder of the repo. This enables us to keep all data contracts and schema definitions in one place. Create a file called data_app_conn_stats.sql and insert the following SQL:
CREATE TABLE data_app_conn_stats (
	dt date,
	source_ip_address string,
	destination_port bigint,
	total_packets_sent bigint,
	total_bytes_sent bigint,
	connection_length_sec bigint
)
PARTITIONED BY dt
TABLE_DATA_RETENTION = 3 DAYS
COMPUTE_CLUSTER = "Default Compute";
Before pushing the changes to the repo, let’s also create the job that will transform and aggregate the intermediate table and load into our target table. Create a new folder called 004-data-apps/ to hold the SQLake jobs that enable our use cases. Inside this folder, create data_app_conn_stats_job.sql and insert the following SQL:
CREATE JOB data_app_conn_stats_job
	COMPUTE_CLUSTER = "Default Compute"
	START_FROM = NOW
	ADD_MISSING_COLUMNS = TRUE
	AS INSERT INTO default_glue_catalog.cicd.data_app_conn_stats
	MAP_COLUMNS_BY_NAME
	SELECT
  	dt,
  	source_ip_address,
  	destination_port,
  	sum(num_packets_transferred::bigint) AS total_packets_sent,
  	sum(bytes_sent::bigint) AS total_bytes_sent,
  	sum(date_diff('second',
       first_packet_received_time,
       last_packet_received_time)) AS connection_length_sec
	FROM default_glue_catalog.cicd.inter_model_flowlogs
	WHERE
  	  log_status = 'OK'
  	  AND action = 'ACCEPT'
  	  AND $commit_time BETWEEN run_start_time() AND run_end_time()
	GROUP BY 1,2,3;
Commit and push the changes to your dev branch. Look in the Actions tab of your repo view successful workflow executions. In my case, I pushed the schema change first and then the job, so I have two different workflows in the screenshot below:

If you return to the SQLake console you should see both the table and the job in the navigation tree. Within a couple of minutes the output table should start populating with data and you can query it from SQLake or your favorite data lake query engine such as Amazon Athena.
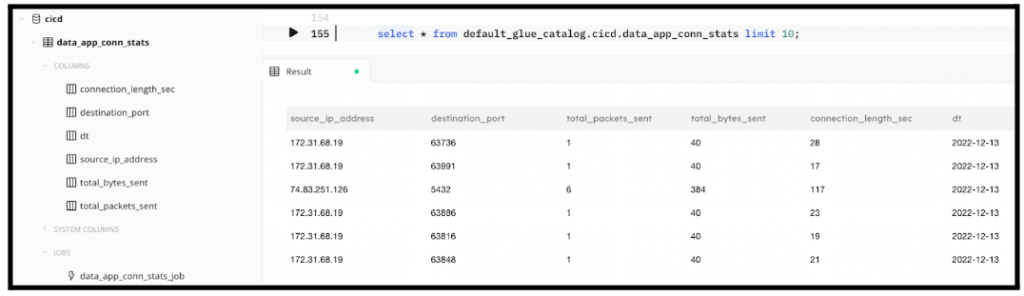
In the following screenshot, from the left navigation tree you can see the table and its columns, as well as the job we created that’s been associated with this table. You can also see that running a query against it returns data as we expected.
Running the same query in Amazon Athena returns similar results:
5. Testing output tables
At this stage all of our connections, tables and jobs, have been created and we’ve used SQLake’s built-in query capabilities to inspect the results and make sure data is flowing. We can add tests into our CI/CD pipeline to automate some of these tasks by creating either a global test folder or individual test folders per data app or ingestion steps. I will leave this exercise to you, but the process is very similar to what we’ve already done. Each test SQL file includes a SELECT query. You can also include multiple tests in a single file and the Github Action will split them and execute them one at a time. Just be certain to end each SQL command with a semicolon. For example:
SELECT count(*) FROM default_glue_catalog.cicd.inter_model_flowlogs;
SELECT count(*) FROM default_glue_catalog.cicd.data_app_conn_stats;
Summary – CI/CD Pipelines and ETL
This is quite a long post, but it was important to cover the key topics in building a CI/CD pipeline for ETL jobs – primarily, how to structure your Git repo, dividing it into staging, intermediate, and raw sections to allow the separation of schemas and jobs between the phases of data refinement. You created a Github Actions workflow file that took SQL code and executed against SQLake to create connections, tables, and jobs. We discussed the importance of creating a data contract consisting of a static schema. Consumers of these tables can easily understand exactly what columns are exposed and know that they can depend on this output not changing without prior notice; this is not enforced by SQLake, but rather by a company process that must be established.
You can try SQLake for free; no credit card required. Continue the discussion and ask questions in our Slack Community.
Published in:
Blog
,
Building Data Pipelines