
Explore our expert-made templates & start with the right one for you.
Announcing: Upsolver joins the Connect with Confluent (CwC) Program
-
 Upsolver Team
- Upsolver News
- September 27, 2023
We are thrilled to announce a powerful partnership between Confluent Cloud and Upsolver. This collaboration will revolutionize how businesses ingest real-time, high-volume application data into Snowflake and the data lake. But before we dive into the compelling benefits of this union, let’s get familiar with the key players.
What is Confluent Cloud?
Confluent Cloud is a fully-managed streaming data service that harnesses the potential of Apache Kafka, enabling businesses to effortlessly manage and orchestrate data in real-time. It alleviates the burden of setting up, maintaining, and scaling Kafka, allowing companies to focus solely on deriving valuable insights from their data streams.
What is Upsolver?
Upsolver is a leading cloud-native data integration platform. Its mission? Making it easy and simple for organizations to ingest high-volume streaming data into modern warehouses and lakes. With Upsolver, teams can move away from custom coding and scripting, embracing an intuitive, visual interface that empowers data professionals of all backgrounds.
Schedule a 1:1 meeting with one of Upsolver’s solution architects to see this integration in action.
Why is this Integration Important?
Apache Kafka, hosted and managed by Confluent Cloud is central to every cloud-native, fast-growing, data-driven organization. It is the heart that pumps data between applications and services. It enables companies to deliver innovative services and capabilities like finding the best place to stay in a new city, finding a ride to your favorite restaurant and paying for the meal all from your mobile phone.
These innovative organizations are pumping immense amounts of data that make it difficult for analytics and ML systems to efficiently consume. For innovation to happen, this data needs to be ingested into a data warehouse or lake so it can be analyzed and used to train machine learning models that produce recommendations, personalization and AI experiences.
Upsolver gives users the superpower to integrate high-volume Kafka streams with popular cloud-native data warehouses or lakes in minutes. Upsolver automatically scales up or down to meet demand, detects and evolves complex nested schemas, manages data loads to control costs, and provides real-time visibility into the health and quality of your data before it is ingested.
Five Key Benefits of Using Confluent Cloud with Upsolver:
Simplified Real-time Data Ingestion: This integration provides a seamless route for your real-time application data to travel from microservices and databases to the warehouse and lake. The complexities of data integration and ingestion become a thing of the past.
Scalability and Performance: By combining Confluent Cloud and Upsolver’s scalability and throughput, businesses can handle vast volumes of data, ensuring that their analytics and applications always receive timely data with little to no maintenance or optimizations.
Cost Efficiency: Minimize infrastructure costs and management headaches. The integration harnesses the power of cloud-native, decoupled and distributed architectures, ensuring you only pay for what you use, without compromising on performance.
Easy to Use: Upsolver simple to use wizard is integrated with Confluent Cloud making it easy for anyone to discover Kafka topics, inspect event data and deploy an ingestion job in minutes. If you prefer code, Upsolver allows you to configure ingestion jobs using SQL. With the Python SDK and dbt Core adapter, you can easily integrate with existing developer tools and workflows.
Enhanced Data Quality and Reliability: Upsolver provides real-time observability into the health of your ingestion job and your data. Using the Data Observability Dashboard, you can detect and prevent data quality issues before they reach your warehouse or lake.
How do you get started?
Watch a short video where I walk through creating a simple ingestion job to move events from Confluent Kafka to Snowflake in just a few clicks.

1. Log in or sign up to Upsolver – https://sqlake.upsolver.com/
It’s easy to get started, just sign up with your company email address for a 14-day trial that includes all of the features and capabilities of Upsolver. If you’re already a user of Upsolver you can log in to deploy your first Confluent + Upsolver pipeline. If you don’t have a Confluent Cloud account you can sign up here.
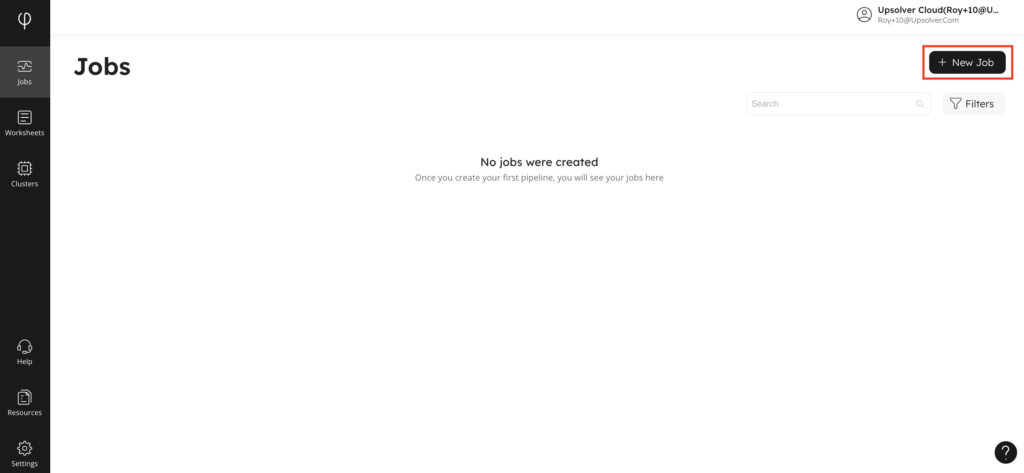
2. Create a new ingestion job.
Creating an ingestion job is simple using the wizard. Start on the Jobs page by clicking New Job.
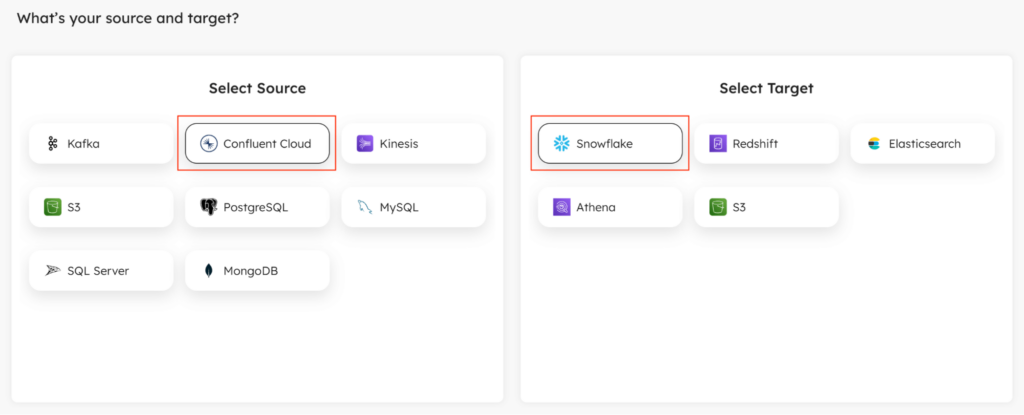
3. Select Confluent Cloud as your source
From the wizard, select Confluent Cloud as your source. In this example, we’ll choose Snowflake as the target. Upsolver is the fastest, most reliable way to incrementally load data into Snowflake. Once selected, click Next to continue.
4. Configure your Confluent Cloud connection and select a topic to ingest
Next step is to configure your Confluent Cloud Kafka connection information. First, log in to your Confluent Cloud account to collect the Bootstrap Servers and Consumer Properties. Also make sure you have your Confluent resource API access and secret keys. Next, configure your Bootstrap servers in Upsolver. If you’re using SASL authentication, configure your Confluent API key and secret. If there are any custom configuration you can define them in Consumer Properties.
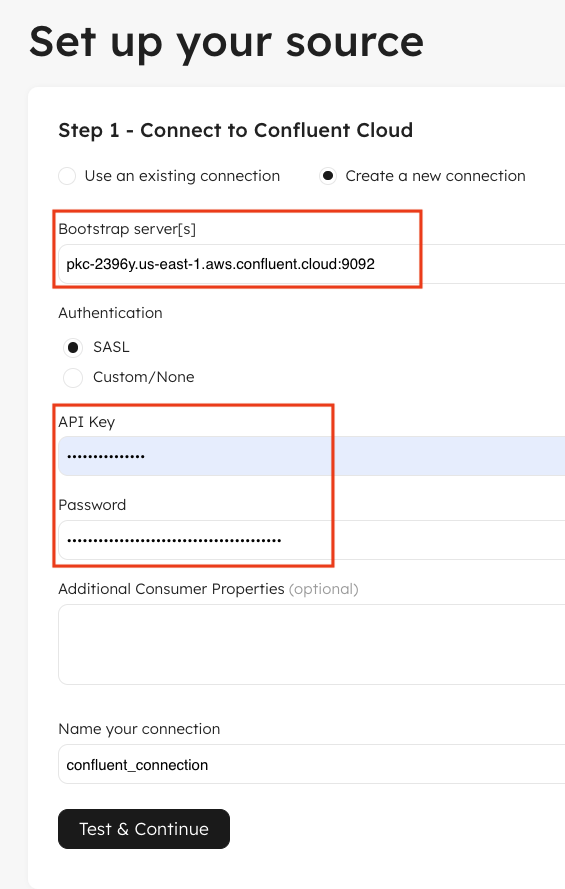
Once configured click Test & Continue. This will validate your connection information and discover available topics in your Kafka cluster.
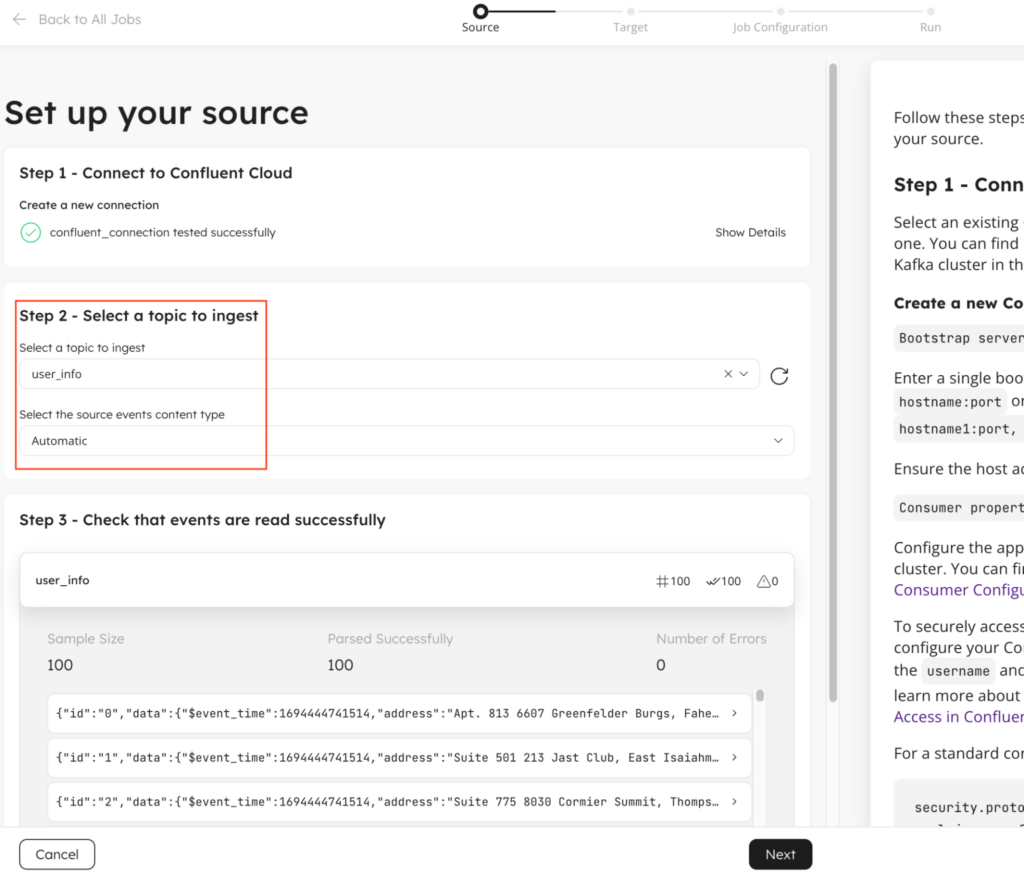
Selecting your topic will automatically attempt to detect the event type, like JSON, Avro, etc. and parse the records. A sample of the parsed events is shown so you can validate the fields.
Confluent Kafka Schema Registry is currently only supported for Avro type. If you would like to use it, select Avro Schema Registry from the event content type drop down.
5. Configure your Snowflake connection and select a target schema to write events
Now that your source topic is selected, you need to connect to Snowflake. The next screen asks you to input the Connection String, Username and Password for your Snowflake connection. Click Test & Continue to validate your connection.
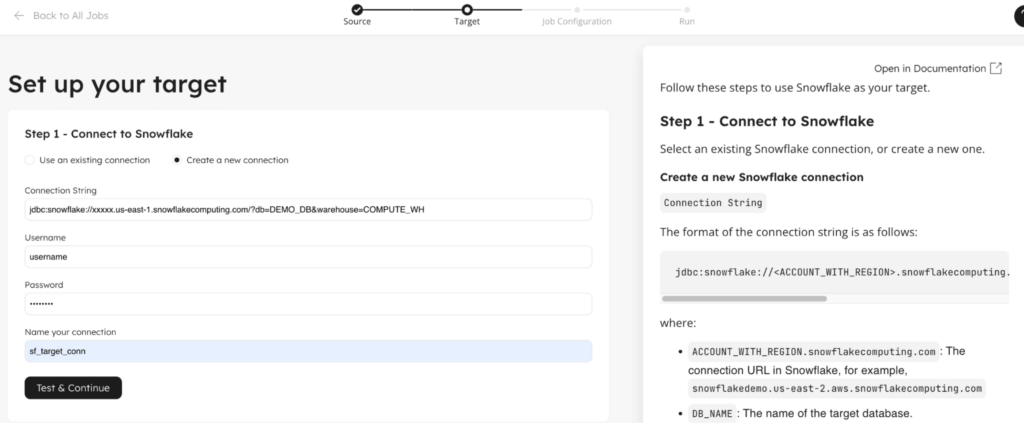
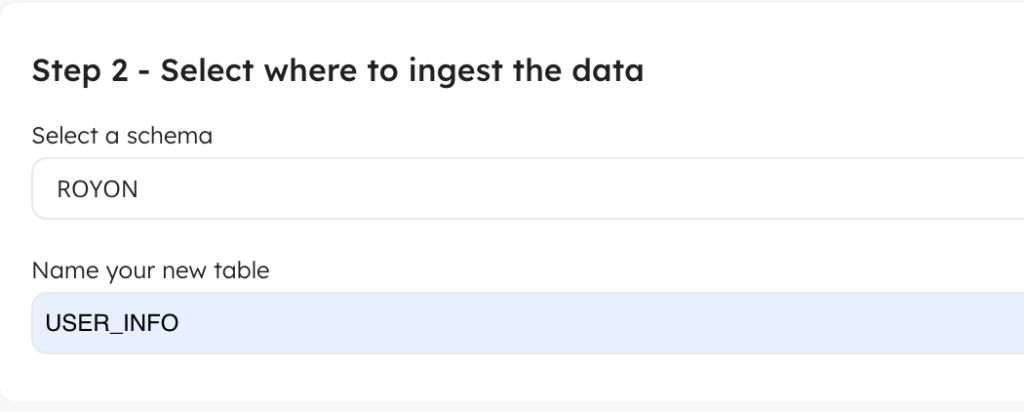
Once connected, you’ll need to select the Snowflake schema and table name you’d like to store the events that will be ingested.
6. Configure which fields to include and how frequently to load data
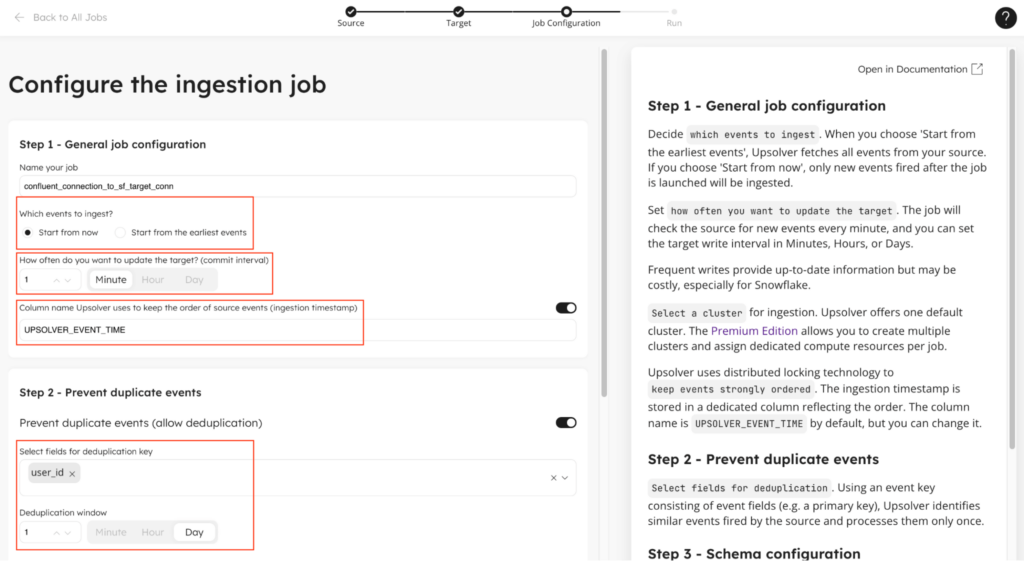
In this next step of the wizard, you need to first configure the behavior Upsolver will take when loading data into the target and second, which source fields to insert into the target table.
First, you choose if you want to start loading data from now or from the beginning of time, i.e. the earliest event available in the topic. In some cases, your topic will retain a few weeks or months of data and it’s beneficial to pull all of that history into the target table. Other times, history isn’t needed and you may want to start capturing events from now only.
Second, you need to choose how often you want to update Snowflake with new data. This is a decision between freshness and cost. The more frequent you update data in Snowflake, the longer your warehouse remains active and cannot be hibernated to save costs. We recommend updating the target every 5 minutes, but you can go as low as 1 minute which will address a large majority of use cases.

Third, Upsolver automatically inserts a column with the timestamp of when the event was ingested. This is in addition to any timestamp fields you may already have in the data. It’s useful because it maintains a globally incrementing time reference that can be used by downstream transformations to ensure accurate incremental processing.
Lastly, if you want to deduplicate the incoming events, you can configure which column to use to determine if a row is duplicate and how far back in time to look for duplicates. Upsolver has a unique architecture to manage state which allows you to dedupe over long periods of time with little to no performance or cost degradation.
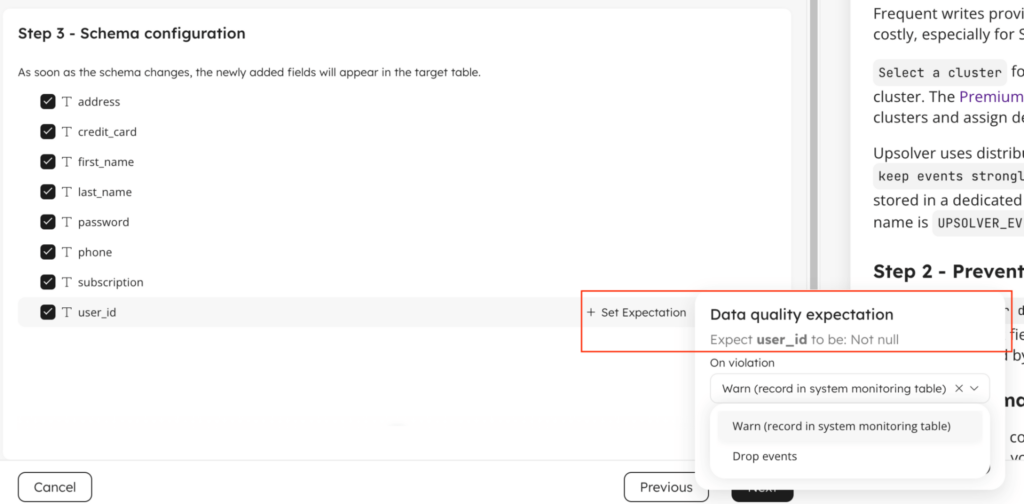
Next, you need to select which fields from the source events you want to ingest into your target table. You can also enforce data quality expectations on each of the fields.
By default the wizard allows you to configure an expectation that the field must not be NULL. If it is you can either warn or drop the row. You can attach additional expectations after the job has been created.
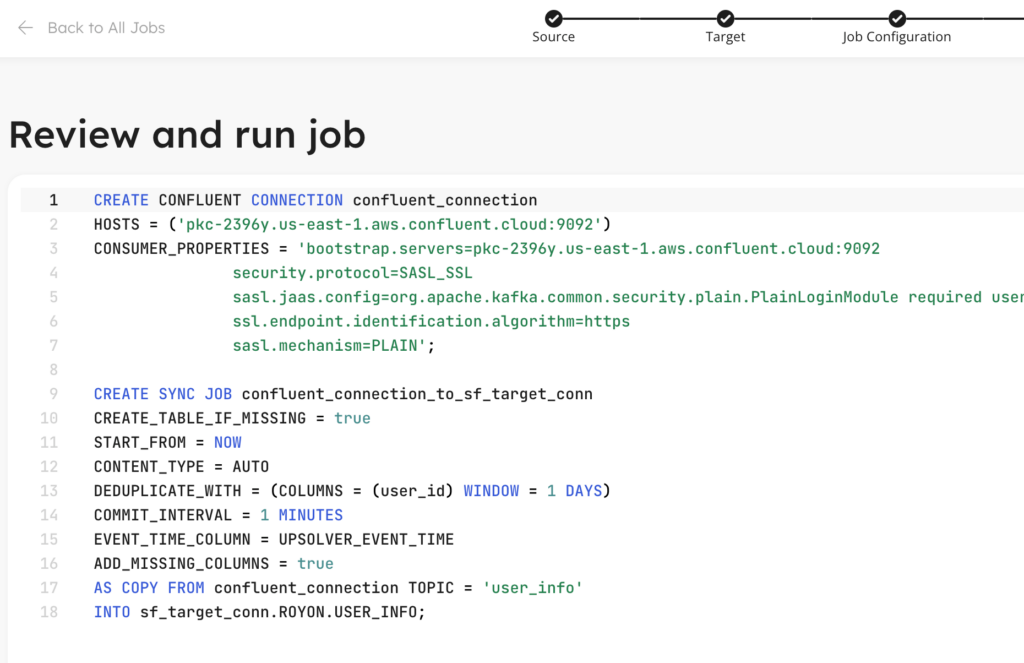
7. Deploy your ingestion job
That’s it, pretty simple. At this point, Upsolver shows you the SQL code that was generated to build your pipeline. You can simply click Run to deploy the pipeline. Note that with this SQL code you can easily check it into version control, ask colleagues to review and even deploy it in another environment for testing before deploying it into production.
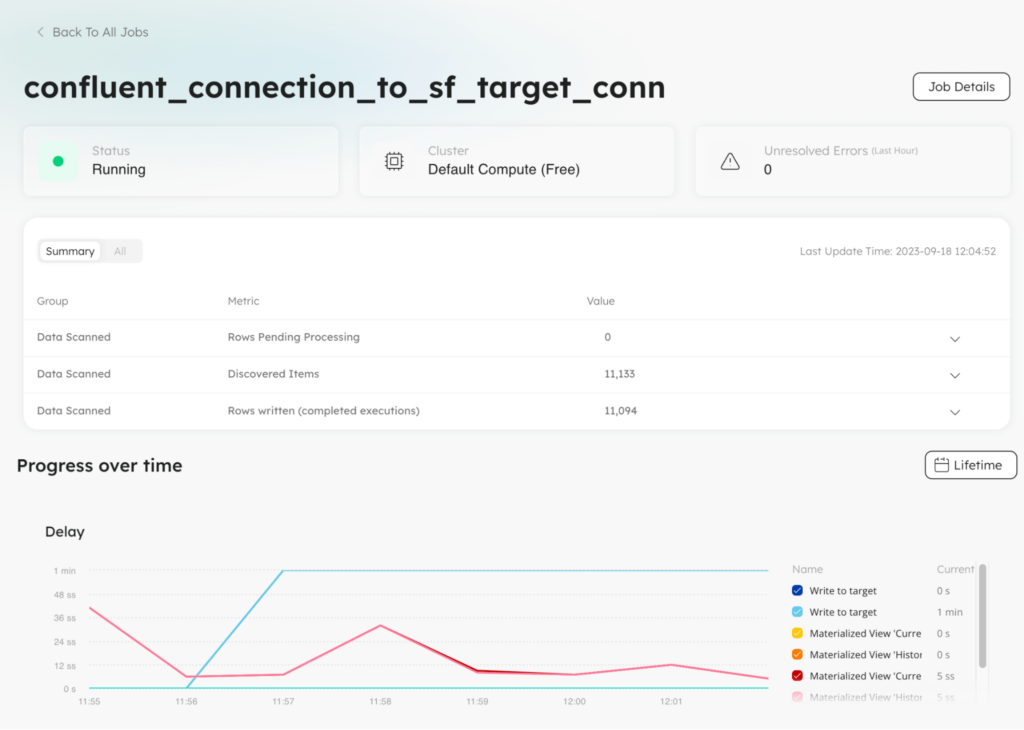
Once the job starts running, it takes a couple minutes to discover events and write them to the target. You can click through to the Jobs page and select the job you just created. There you will find lots of useful information about the health of the pipeline and when was the last time data was updated in your target table.
Summing it up
The partnership and integration between Confluent Cloud and Upsolver signifies an evolution in high-scale, high-volume and real-time data ingestion. As organizations seek to harness their application data for actionable insights and game-changing AI, this collaboration offers a simple to use, high performance, and cost effective solution.
Ready to redefine your data journey? Embrace the future with Confluent Cloud and Upsolver today!
Schedule a quick, no-strings-attached demo with a solution architect, or get started building your first pipeline with our 14 day free trial.
Published in:
Blog
,
Upsolver News